Author Archives: Therm

Honeywell RTH9580 Wi-Fi Color Touchscreen Programmable Thermostat User Manual

Honeywell RTH9580 Wi-Fi Color Touchscreen Programmable Thermostat User Manual

The RTH9580WF touchscreen, Wi-Fi thermostat for 24V systems, and it has two requirements that trip people up: it needs a C (common) wire for power, and it is configured through on-screen setup menus rather than a dial. The steps below follow the manual and cite its pages, and the full user guide PDF is linked here.

Download Honeywell RTH9580 Wi-Fi User Guide (PDF)

Table of Contents

What the RTH9580WF Is

The RTH9580WF is a Wi-Fi, color-touchscreen, programmable thermostat for residential or light-commercial use. From the guide’s overview:

  • Touchscreen controls. HOME, FAN, SYSTEM and MENU are touch keys; a tap raises or lowers the setpoint and lets you place a temporary or permanent hold.
  • Selectable schedule. Program schedules run two or four periods per day (you choose during setup), and the thermostat supports both home and business modes.
  • Wi-Fi and app. It connects to your wireless network so you can set it up and adjust it remotely after registration.
  • Runs on 24VAC. It fits forced-air, hydronic and heat-pump systems, and it requires a C wire for power.

Before You Install

  • Confirm the RTH9580WF fits your system. It runs 24V systems such as forced air, hydronic, heat pump, oil, gas and electric; it will not work on millivolt systems such as a gas fireplace, or on 120/240V electric baseboard heat.
  • You must have a C wire. The guide states the C (common) wire is the power source and, without it, the thermostat will not power up (p.11). If no C terminal is used on your old thermostat, review the alternate-wiring options before you proceed.
  • Turn off power at the breaker or the system’s service switch.
  • Photograph the existing wire connections before you disconnect anything; the guide asks you to keep this picture for wiring the new unit (p.9).
  • Label each wire with its terminal letter using the supplied labels. Match by letter, not by wire color.
  • If the old thermostat contains mercury in a sealed tube, do not bin it; the guide points to the Thermostat Recycling Corporation at thermostat-recycle.org.

Wiring and the C-Wire

Wire the new base by matching your labeled wires to the same-letter terminals, then check a few specific cases the guide calls out (pp.9–11):

  • C. Connect the C (common) wire; it supplies the 24VAC power the Wi-Fi thermostat needs.
  • R and Rc. If your old thermostat had both R and RH wires, connect R to the Rc terminal, RH to the R terminal, and unplug the jumper loop between R and Rc.
  • Heat-pump O/B. If you have separate O and B wires, attach the B wire to the C terminal as the guide’s alternate-wiring note directs; confirm the changeover-valve type later in System Setup.
  • Anything you do not use. Cap unused wires with the supplied labels or tape so they cannot touch.

The manufacturer’s own wiring video and the Special-wiring tables cover cases the short steps do not, so use them when your terminals look different.

System Setup and Wi-Fi

After power is restored, the on-screen setup screens tell the thermostat what it is controlling. Set the items on the System Setup screens to match your equipment: your system type, your thermostat controls (heat-only or heat and cool), your fan control, and, for heat pumps, the type of changeover valve (pp.65–66). Then set the date and time and start your program schedule.

For Wi-Fi, use the setup to join your wireless network and register the thermostat. The guide notes an enrollment code is created at registration so you can link the unit in the companion mobile app.

Using the Thermostat

  • HOME / FAN / SYSTEM / MENU. The main touch keys for the screen, fan mode, system mode and options.
  • System modes. Heat, Cool, Off, and on heat pumps an Emergency Heat option; choose a mode with SYSTEM.
  • Auto changeover. For climates where you may need heating and cooling on the same day; enable it on the changeover screen under Advanced Preferences.
  • Holds. Tap to change the temperature for a temporary hold until the next period, or set a permanent hold; a vacation hold is also provided.
  • Schedules. Program four periods per day (wake, leave, return, sleep) for the weekday and weekend patterns.

Comfort Features

  • Smart Response Technology (home mode) learns how long your system takes to reach a setpoint so it arrives on time.
  • Compressor protection holds the compressor for about 5 minutes after a change; the screen shows “Wait” (p.59).
  • Furnace filter reminder prompts you to change the filter on the interval you set.
  • Equipment status screens show what the thermostat is calling for at a glance.

Troubleshooting

These are the guide’s own troubleshooting items (pp.71–72). Use them before assuming a fault.

Problem What the guide says to do
Display is blank Reset the circuit breaker; confirm the system power switch is on and the furnace door is closed; make sure the C wire is connected.
Cannot change the system to Cool Set the System Setup “Your thermostat controls” / “Your system type” to match your equipment.
Fan does not run when heating Set the System Setup “Your fan control” to match your heating equipment.
“Wait” appears Compressor protection is active. Wait 5 minutes for the system to restart.
Heat pump blows cool air in heat mode (or warm in cool mode) Check the System Setup “Type of changeover valve” so it matches your heat pump.
Heating or cooling does not respond Touch SYSTEM and set Heat (temperature above indoor) or Cool (below indoor); check breaker, power switch and furnace door; wait out the “Wait” delay.

Specifications

  • Type: Wi-Fi color-touchscreen programmable thermostat.
  • Power: 24VAC; a C (common) wire is required.
  • System fit: forced air, hydronic and heat pumps (24V); not for 120/240V electric baseboard.
  • Modes: Heat, Cool, Off; Auto changeover; Emergency Heat on heat pumps.
  • Schedule: four periods per day; home and business programs.
  • Features: Smart Response, compressor protection, filter reminder, remote access after registration.
  • Backup: a coin-cell battery keeps settings through outages.
  • Warranty: limited (see the guide); for help use the Customer Assistance section (honeywell.com/yourhome).

FAQ

Does the RTH9580WF need a C wire?

Yes. The guide states the C wire is the power source and the thermostat will not power up without it. If you lack one, review the alternate-wiring options first.

Can I control it from my phone?

Yes. After you join a Wi-Fi network and register the thermostat, an enrollment code lets you link it in the companion app for remote adjustment.

Does it work with a heat pump?

Yes, single-stage heat pumps. You set the changeover-valve type in System Setup, and there is an Emergency Heat mode for heat pumps with auxiliary heat.

Why does the screen say “Wait”?

Compressor protection. The thermostat delays the compressor about 5 minutes after a change to prevent short-cycling (p.59).

How many programs does it run?

Four periods per day (wake, leave, return, sleep), with weekday and weekend patterns, in either a home or business schedule.
Honeywell RTH230B Programmable Electronic Thermostat Installation and User Guide

Introduction

The RTH230B programmable thermostat can be used to control:

  • a gas, fuel oil or electric furnace – 2 or 3 wires
  • a central air conditioner – 2 or 3 wires
  • a hot water system with or without pump – 2 wires
  • a millivolt system – 2 wires
  • a central heating and cooling system – 4 or 5 wires

Note: This thermostat is not compatible with heat pumps or multi-stage systems.

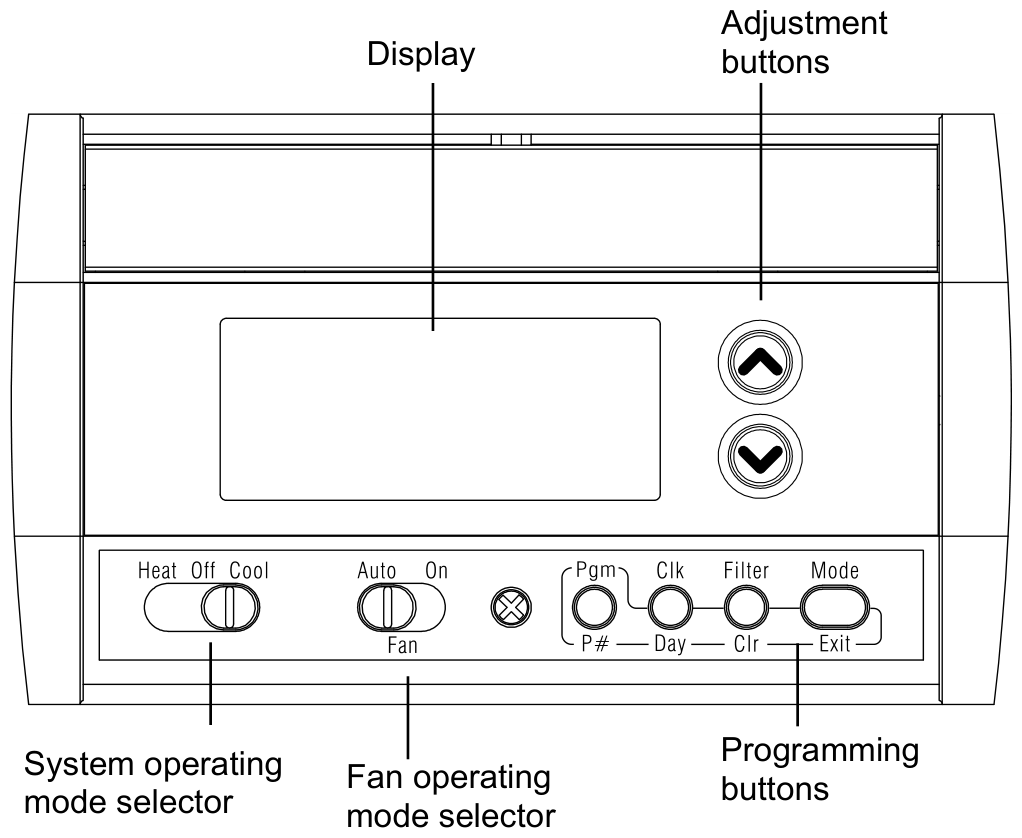
RTH230B front panel with the display, adjustment buttons, system and fan operating mode selectors and programming buttons
Front panel: display, adjustment buttons, system and fan operating mode selectors, programming buttons.

Features

  • System operating mode selection: heat, cool or off
  • Fan operating mode selection: automatic or on (continuous)
  • Programmable heating and cooling cycle lengths: 10, 12, 15, 20 or 30 minutes
  • Temperature display in °F or °C
  • Battery replacement indicator
  • 5-2 programming including:
    • Preprogrammed energy-saving schedule
    • Early Start
    • Temporary bypass
    • Time display (12 h or 24 h)
  • Filter replacement indicator

Installation

WARNING — Risk of electric shock. In order to avoid any risk of electric shock, cut power to the heating system.

2.1 Removing the old thermostat

  1. Remove the old thermostat to access the wires.
    Warning: If the old thermostat was mounted onto an electrical box, it was probably powered by 120/240 volts. In this case, this thermostat cannot be used.
  2. Identify and label each wire (with the corresponding letter on the wire terminal) and remove them from the terminals.
  3. If necessary, strip the end of each wire (maximum of 1/4 inch).
  4. Wrap the wires around a pencil to prevent them from falling into the wall.
  5. If the hole in the wall is too big, insulate it using a non-flammable material in order to avoid air draughts behind the thermostat.

2.2 Installing the new baseplate

For a new installation, choose a location approximately 5 feet (1.5 m) above the floor and on an inside wall. Avoid draughty areas (top of staircase, air outlet, etc.), dead air spots (behind doors), direct sunlight or areas near concealed pipes or chimneys.

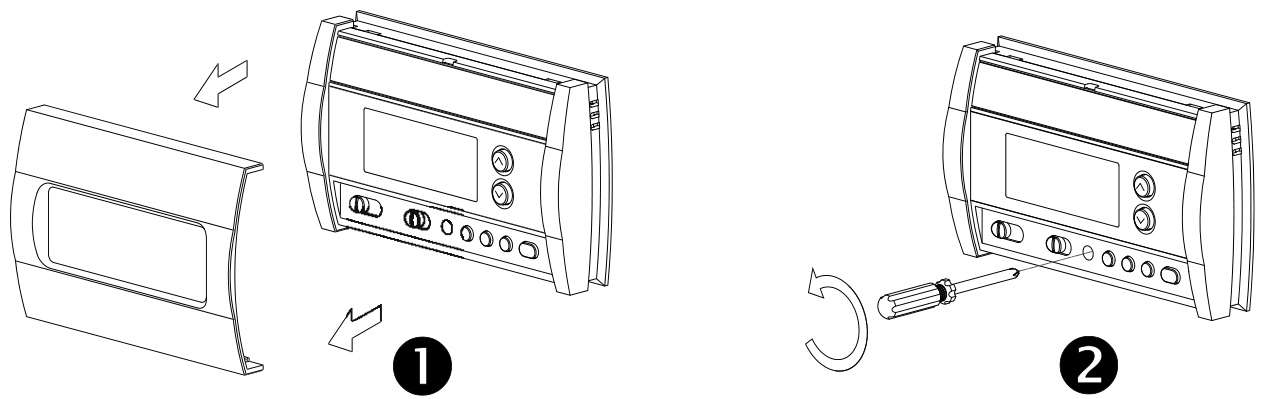
Steps 1 and 2 of installing the new baseplate: removing the faceplate and loosening the locking screw
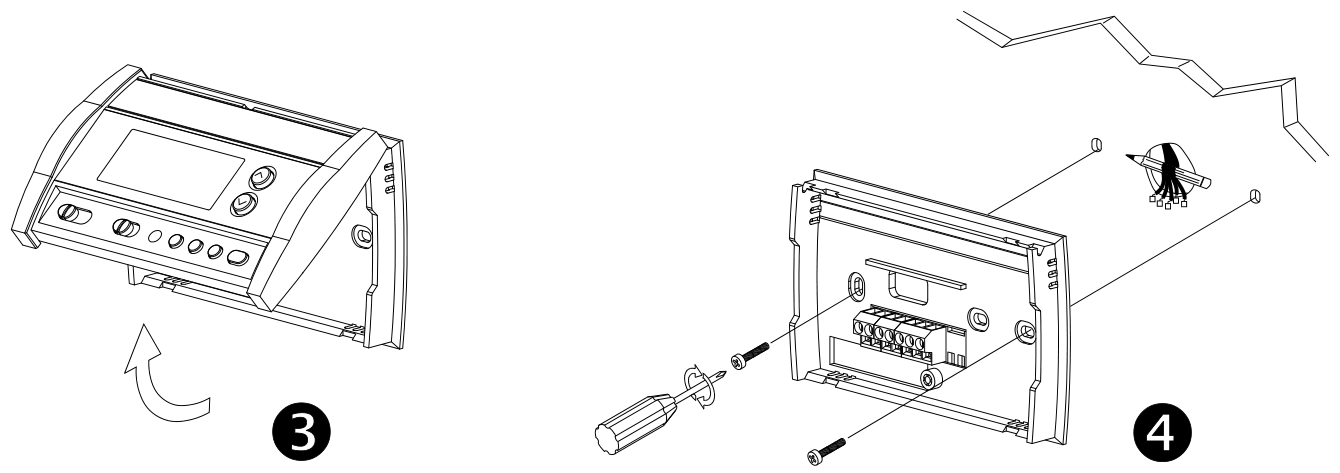
Steps 1–2: the faceplate is removed, then the locking screw is loosened to separate the thermostat from its baseplate.
  1. Remove the thermostat faceplate.
  2. Loosen the locking screw to separate the thermostat from its baseplate (the screw cannot be completely removed).
Steps 3 and 4: tilting the thermostat upwards and marking the mounting holes
Steps 3–4: tilt the thermostat upwards, then mark and bore the mounting holes and insert the plastic anchors.
  1. Tilt the thermostat upwards.
  2. Mark and bore the appropriate mounting holes (or use the existing holes). Insert the plastic anchors.
  3. Pass the wires through the opening of the baseplate and fix the baseplate to the wall using the screws provided.

2.3 Connecting the thermostat

The connection of the new thermostat should be similar to that of the old thermostat; however, it can vary depending on the installation.

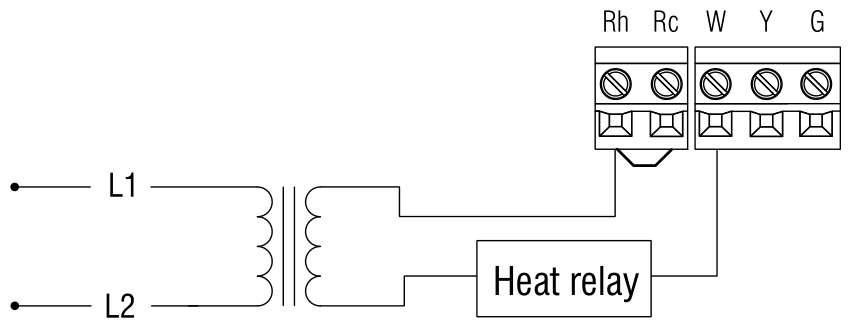
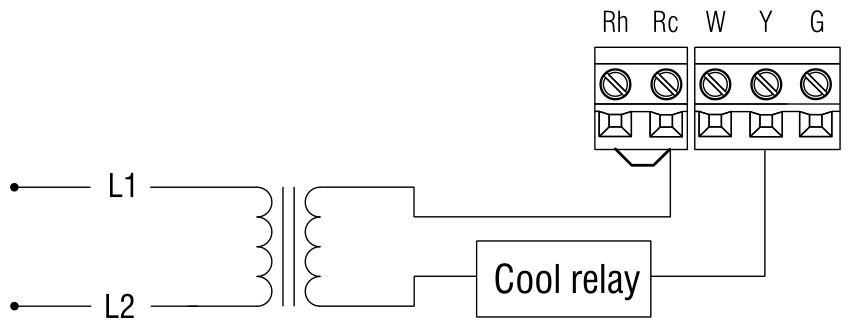
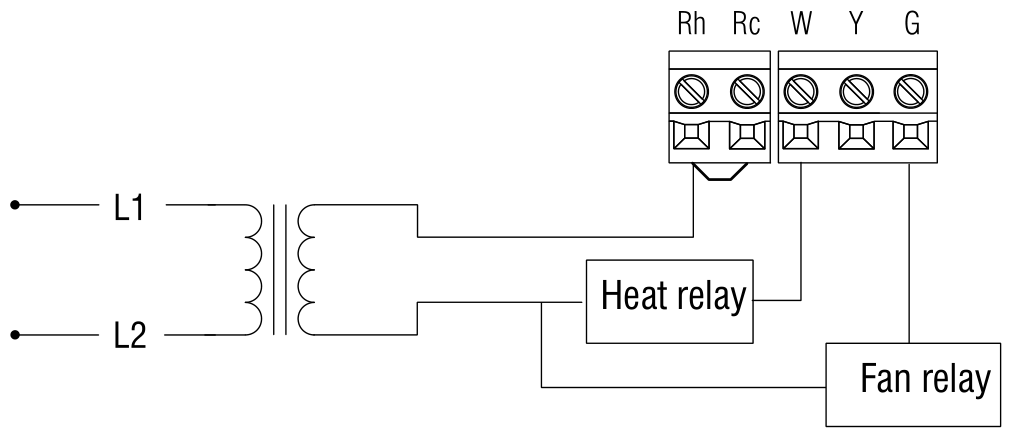
Rh Heating power supply
Rc Cooling power supply
W Heating signal
Y Cooling signal
G Fan

Note: The red jumper wire between the Rc and Rh terminals must be removed in 2- or 5-wire installations. The jumper must be used in 3- or 4-wire installations if you wish to use the mode selector switch for the fan.

2.3.1 2-wire heating

Wiring diagram for a 2-wire heating system: L1 and L2 through the transformer to Rh and W

2.3.2 2-wire cooling

Wiring diagram for a 2-wire cooling system: L1 and L2 through the transformer to Rc and Y

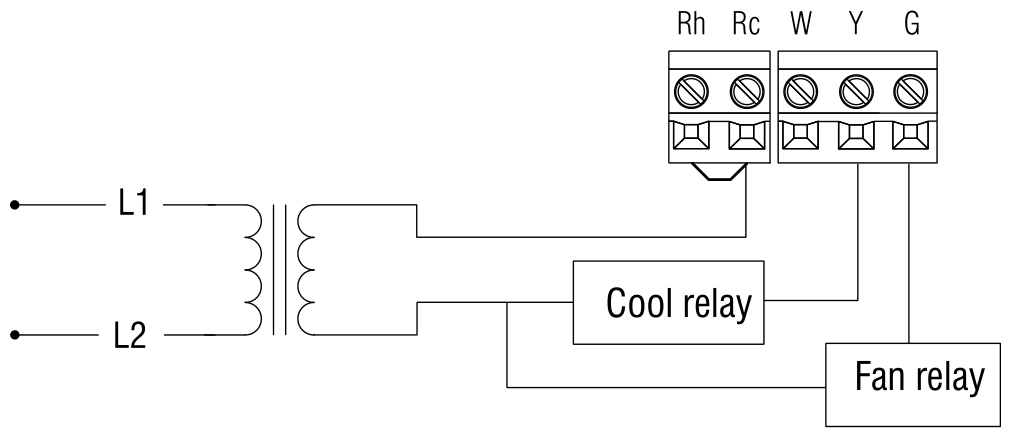
2.3.3 3-wire heating

Wiring diagram for a 3-wire heating system with heat relay and fan relay

2.3.4 3-wire cooling

Wiring diagram for a 3-wire cooling system with cool relay and fan relay

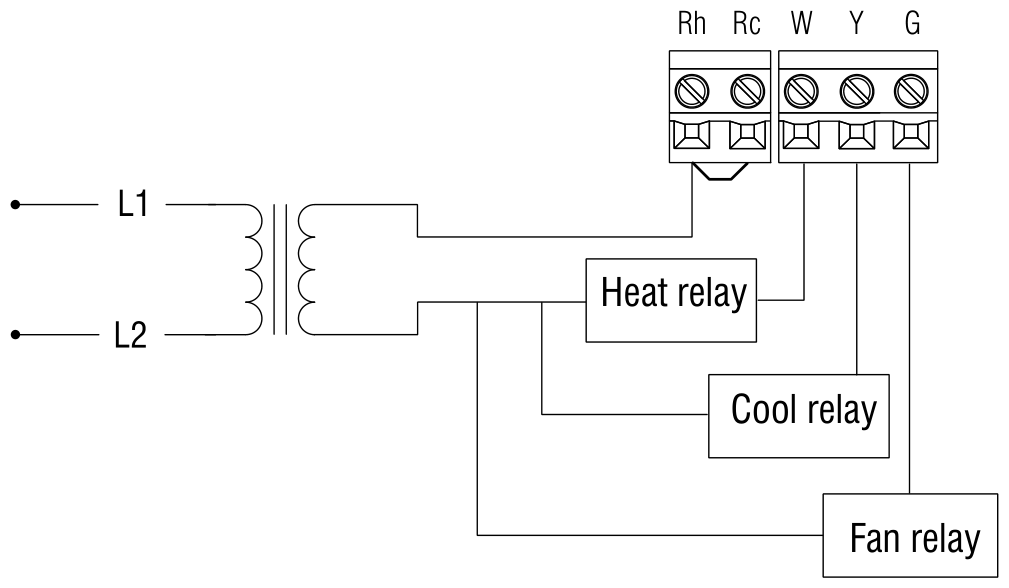
2.3.5 4-wire heating and cooling

Wiring diagram for a 4-wire heating and cooling system with heat relay, cool relay and fan relay

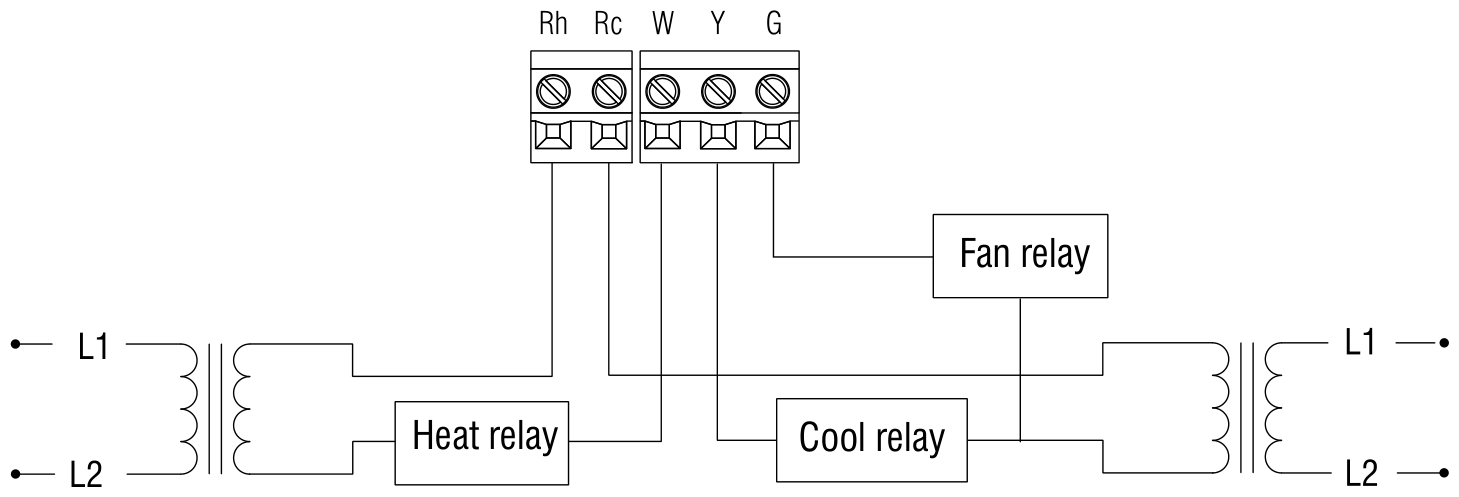
2.3.6 5-wire heating and cooling

Wiring diagram for a 5-wire heating and cooling system with two transformers, heat relay, cool relay and fan relay

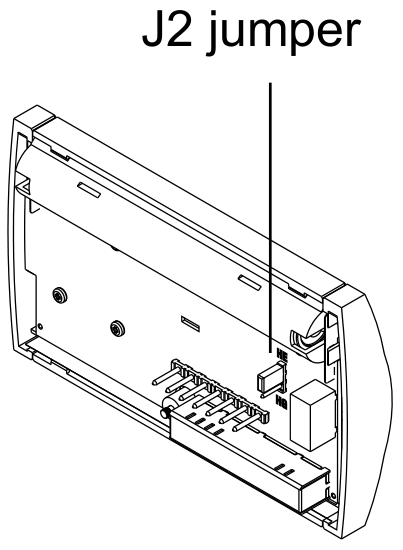
2.4 Setting J2 jumper

The jumper defines the fan operation when the fan is placed in automatic mode.

Location of the J2 jumper on the back of the thermostat baseplate
Location of the J2 jumper.
J2 jumper Setting
HE Use this setting if you have an electric furnace. In this setting, when the fan is placed in automatic mode, it works only when heating or cooling is activated.
HG Use this setting if you have a gas or fuel oil furnace. In this setting, when the fan is placed in automatic mode, it works as follows:
  • When the thermostat is placed in cool mode, the fan works only when cooling is activated.
  • When the thermostat is placed in heat mode, the fan is controlled by the furnace fan control circuitry.

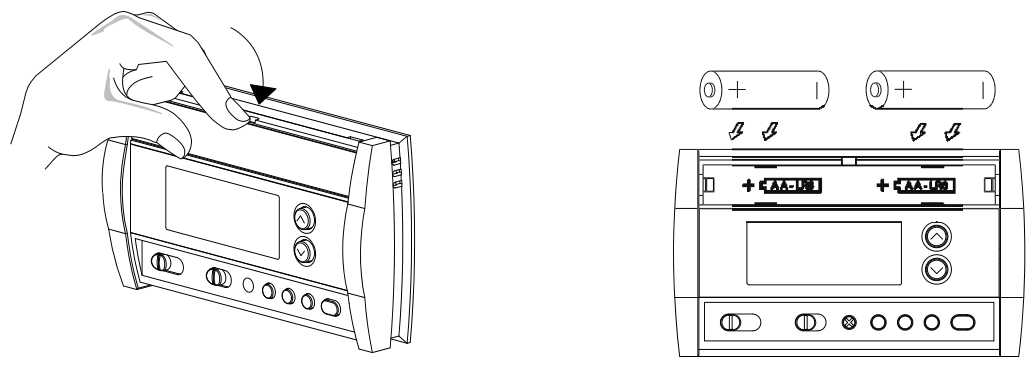
2.5 Installing the batteries

Removing the battery cover and installing two AA batteries in the polarity shown
Pulling out the battery cover and installing the batteries in the polarity shown.
  1. Pull out the battery cover.
  2. Install the batteries as shown. Observe the polarity.
  3. Reinstall the battery cover. You will hear a clicking sound.

After the batteries are installed, the thermostat performs a series of tests for approximately 5 seconds.

Afterwards, the screen displays the actual temperature. It is normal that the displayed temperature be higher than the ambient temperature if you are holding the thermostat. The thermostat will display the ambient temperature once it is installed on the wall. By default, the setpoint is 70°F (21°C).

2.6 Completing the installation

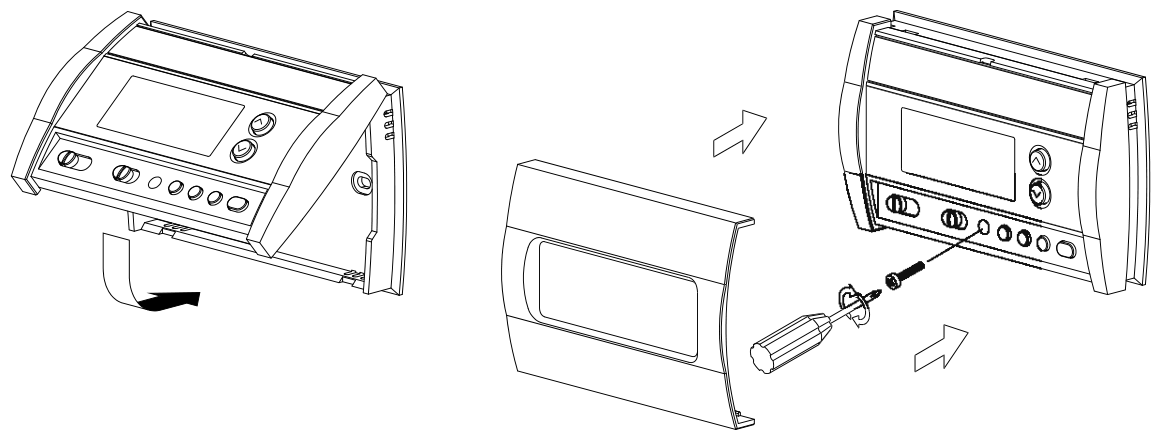
Mounting the thermostat on the baseplate, securing it with the locking screw and installing the faceplate
Mounting the thermostat on the baseplate and installing the faceplate.
  1. Once the baseplate and the batteries are installed, mount the thermostat on the baseplate.
  2. Secure the thermostat using the locking screw and install the faceplate.
  3. Apply power back to the system.

Basic functions

3.1 System operating mode

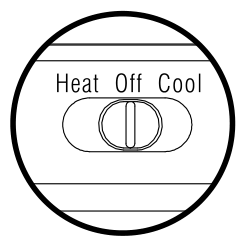
Use the selector switch to place the system in Heating mode (HEAT) or Cooling mode (COOL), or to set the system off.

System operating mode selector with Heat, Off and Cool positions

Note: When you place the thermostat in Cooling mode, you might need to wait up to five minutes before cooling can start. This is a safety feature for the compressor. A snowflake icon will flash on the screen until cooling can start again.

3.2 Fan operating mode

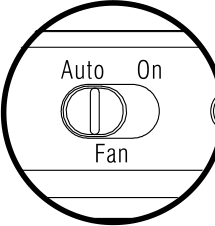
Use the selector switch to set the fan to automatic mode (AUTO) or continuous mode (ON).

Fan operating mode selector with Auto and On positions

Note: This switch is not used if you have a 2-wire installation as the fan is not connected to the thermostat.

Setting Fan behavior in automatic mode
AUTO
  • If you have an electric furnace (see section 2.4), the fan works only when heating or cooling is activated.
  • If you have a gas or fuel oil furnace (see section 2.4), the fan works as follows:
    • When the thermostat is placed in cool mode, the fan works only when cooling is activated.
    • When the thermostat is placed in heat mode, the fan is controlled by the furnace fan control circuitry.
ON The fan is always on.

3.3 Displaying the temperature

The actual temperature is normally displayed. To view the setpoint, press once on one of the ▲ ▼ buttons. The setpoint is displayed for 5 seconds along with the snowflake icon.

Note: Pressing either of the ▲ ▼ buttons more than once will change the setpoint.

3.4 Setting the temperature

Press one of the ▲ ▼ buttons until the desired temperature is displayed.

3.5 Thermostat control mode

3.5.1 Manual/Permanent Hold Mode. Maintains the temperature at a fixed setpoint. To place the thermostat in this mode, press [ Mode ]. The house icon will disappear.

3.5.2 Programmable Mode. Maintains the temperature according to the energy-saving schedule. To place the thermostat in this mode, press [ Mode ]. The current period will be displayed. The four possible periods are:
The four program periods shown as house icons: Wake up, Leave for work, Return home and Sleep

To see the default settings of each period, see section 5.2.

Temporary Bypass. If you modify the temperature (using the ▲ ▼ buttons) when the thermostat is in programmable mode, the new temperature will be used for the next 2 hours. The house icon flashes during the bypass. At the end of the bypass period, the thermostat returns to the temperature settings of the period currently underway.

3.6 Filter replacement indicator

After 500 hours of operation, an icon appears to indicate that the filter needs replacement. Once the filter is replaced, press [ Filter ] for 3 seconds to remove the icon and reset the counter.

Filter button on the thermostat

3.7 Battery replacement indicator

An icon appears when the batteries need replacement. This icon will flash for 120 days, then the thermostat will cut power to the heating/cooling unit. The icon disappears once the batteries are replaced.

Low battery icon shown on the thermostat display

After replacing the batteries, readjust the time and day (see section 5.1). However, the temperature and program settings are saved and do not need to be re-entered.

Warning: Before removing the batteries, place the system switch on the thermostat to Off. Otherwise, the heating/cooling unit might still be running even after the batteries are removed.

4. Configuration menu

  1. To access the configuration menu, press both ▲ ▼ buttons simultaneously for 3 seconds.
  2. To go to the next parameter (menu item), briefly press both ▲ ▼ buttons simultaneously.
  3. To modify a parameter, press one of the ▲ ▼ buttons.
  4. Repeat steps 2 and 3 if necessary.
  5. Press both ▲ ▼ buttons simultaneously for 3 seconds to exit the configuration menu.
Display Description Default Options
°F °C Temperature display °F °C or °F
Hr Time display 12 h 12 h or 24 h
ES Early Start 1 Off On or Off
PH Heating cycles per hour 2 4 2, 3, 4, 5 or 6 3
PH Cooling cycles per hour 2 4 2, 3, 4, 5 or 6 4

1 When Early Start is On, the thermostat determines when to start heating or cooling so that the desired temperature is reached at the set time.
2 When either the heating or cooling parameter is displayed, use the system mode selector switch to alternate between the two parameters.
3 For optimal heating control, use the setting that matches your system as follows: 2=30 min (steam, gravity), 3=20 min (hot water, 90%+ high-efficiency furnace), 4=15 min (gas or oil), 5=12 min (alternate setting for gas or oil), 6=10 min (electric).
4 The corresponding cooling cycle lengths are as follows: 2=30 min, 3=20 min, 4=15 min, 5=12 min, 6=10 min

5. Programming

5.1 Setting the time and day

  1. Press [ Clk ]. The hour flashes.
  2. Set the hour using ▲ ▼.
  3. Press [ Clk ]. The minutes flash.
  4. Set the minutes using ▲ ▼.
  5. Press [ Clk ]. The day flashes.
  6. Set the day using ▲ ▼.
  7. Press [ Exit ] to exit.

5.2 Energy-saving schedule

Your thermostat is preprogrammed with an energy-saving schedule. The schedule automatically controls your heating or cooling system by switching from one setpoint to the next according to the preset times.

Period Mode Setpoint Monday to Friday Saturday & Sunday
Wake up Heating 70°F (21°C) 6:00 a.m. 6:00 a.m.
Cooling 78°F (25.5°C)
Leave for work Heating 62°F (16.5°C) 8:00 a.m. —
Cooling 85°F (29.5°C)
Return home Heating 70°F (21°C) 6:00 p.m. —
Cooling 78°F (25.5°C)
Sleep Heating 62°F (16.5°C) 10:00 p.m. 10:00 p.m.
Cooling 82°F (28°C)

To use the schedule, place the thermostat in programmable mode.

5.3 Modifying the schedule

You can program up to 4 periods per day, each period having its own temperature settings. The same program is repeated daily from Monday through Friday and another program is used for Saturday and Sunday. For each period, you can set the start time, the heating setpoint and the cooling setpoint.

Note: If you wish to use only 2 periods, set periods “1 and 4” or periods “2 and 3”. Early Start will not work if you set periods “1 and 2” or periods “3 and 4”.

  1. Press [ Pgm ]. The settings for period 1 are displayed.
  2. Select the program using the [ Day ] button (MO TU WE TH FR appears when the Monday-Friday program is selected or SA SU appears when the Saturday/Sunday program is selected). Press for 3 seconds to select all 7 days.
  3. Set the time (in increments of 15 minutes) using the ▲ ▼ buttons.
  4. Press [ P# ]. The heating or cooling setpoint flashes depending on the position of the Heat/Cool selector.
  5. Set the desired temperature for the displayed period using the ▲ ▼ buttons.
  6. Use the Heat/Cool selector to switch to the other mode (e.g., if you were in Heating mode, switch to Cooling mode). The setpoint for that mode flashes.
  7. Set the desired temperature using the ▲ ▼ buttons.
  8. Press [ P# ] to go to the next period.
  9. Repeat steps 2 to 8 for each of the remaining periods.
  10. Press [ Exit ] to exit.
Thermostat display during programming, labelled with period start time, program days, period number and temperature setting
Display during programming: period start time, program days, period number and temperature setting.

Note: During programming, to skip a period, press [ CLR ] while the period is displayed. For example, in the predefined energy-saving schedule, periods 2 and 3 have been skipped for Saturday and Sunday.

To use the schedule, place the thermostat in programmable mode.

6. Technical specifications

Power supply2 AA batteries
Maximum load1 A @ 24 Vca per output
Setpoint range (heating)41 to 82°F (5 to 28°C)
Setpoint range (cooling)59 to 95°F (15 to 35°C)
Display range23 to 122°F (-5 to 50°C)
Storage temperature-2 to 122°F (-20 to 50°C)
Temperature display resolution1°F (0.5°C)
Accuracy± 1°F (0.5°C)
Heating/cooling cycle lengths10, 12, 15, 20 or 30 minutes (programmable)
Compressor short-cycle protection (minimum off time)5 minutes
Data memorynon-volatile
Dimensions5 in. x 3 in. x 1 in. (127 mm x 75 mm x 28 mm)

7. Warranty

Honeywell warrants this product, excluding battery, to be free from defects in the workmanship or materials, under normal use and service, for a period of one (1) year from the date of purchase by the consumer. If at any time during the warranty period the product is determined to be defective or malfunctions, Honeywell shall repair or replace it (at Honeywell’s option).

If the product is defective,

  1. (i) return it, with a bill of sale or other dated proof of purchase, to the place from which you purchased it, or
  2. (ii) call Honeywell Customer Care at 1-800-468-1502. Customer Care will make the determination whether the product should be returned to the following address: Honeywell Return Goods, Dock 4  MN10-3860, 1885 Douglas Dr N, Golden Valley, MN 55422, or whether a replacement product can be sent to you.

This warranty does not cover removal or reinstallation costs. This warranty shall not apply if it is shown by Honeywell that the defect or malfunction was caused by damage which occurred while the product was in the possession of a consumer.

Honeywell’s sole responsibility shall be to repair or replace the product within the terms stated above. HONEYWELL SHALL NOT BE LIABLE FOR ANY LOSS OR DAMAGE OF ANY KIND, INCLUDING ANY INCIDENTAL OR CONSEQUENTIAL DAMAGES RESULTING, DIRECTLY OR INDIRECTLY, FROM ANY BREACH OF ANY WARRANTY, EXPRESS OR IMPLIED, OR ANY OTHER FAILURE OF THIS PRODUCT. Some states do not allow the exclusion or limitation of incidental or consequential damages, so this limitation may not apply to you.

THIS WARRANTY IS THE ONLY EXPRESS WARRANTY HONEYWELL MAKES ON THIS PRODUCT. THE DURATION OF ANY IMPLIED WARRANTIES, INCLUDING THE WARRANTIES OF MERCHANTABILITY AND FITNESS FOR A PARTICULAR PURPOSE, IS HEREBY LIMITED TO THE ONE-YEAR DURATION OF THIS WARRANTY. Some states do not allow limitations on how long an implied warranty lasts, so the above limitation may not apply to you.

This warranty gives you specific legal rights, and you may have other rights which vary from state to state.

If you have any questions concerning this warranty, please write Honeywell Customer Relations, 1985 Douglas Dr, Golden Valley, MN 55422 or call 1-800-468-1502. In Canada, write Retail Products ON15-02H, Honeywell Limited/Honeywell Limitée, 35 Dynamic Drive, Toronto, Ontario M1V4Z9.

8. Customer assistance

If you have any questions about the operation of your thermostat, please go to www.honeywell.com/yourhome, or call Honeywell Customer Care toll-free at 1-800-468-1502.

Honeywell 69-1800—03 · 03-11 · Printed in U.S.A.

Honeywell CT30 Low-voltage Thermostat Owner’s Manual

Honeywell CT30 Low-voltage Thermostat Owner’s Manual

This page walks through the Honeywell CT30 Low-voltage Thermostat Owner’s Manual (document 69-1808EF). The CT30 is a simple heat-only, non-programmable thermostat that runs on two wires, so the setup is short: check that it matches your system, mount the base, set one adjustment lever, and connect two wires. The steps below are taken from the manual and noted with their page, and the owner’s manual PDF is linked here. Turn off power before you begin.

Download Honeywell CT30 Owner’s Manual (PDF)

Table of Contents

What the CT30 Is

The CT30 is a low-voltage, heat-only, non-programmable thermostat. You set the temperature by moving a lever, and there are no schedules or buttons to program (pp.1,6). The same manual also covers the CT33, which is similar but adds a far-left lever position to turn the system off (p.6). Both are simple replacements for an existing two-wire heat thermostat.

Is It the Right Thermostat? Count the Wires

Before installing, the manual has you count wires. Look at the wires attached to your old thermostat’s terminals, but do not count any wire on a C or C1 terminal (p.2):

  • Two wires: proceed with the installation.
  • Three or more wires: the CT30 may not be compatible. Stop and call Honeywell at 1-800-468-1502 for advice.

In short, the CT30 is for a basic heat-only circuit. It has terminals only for power and heat, so a system with a cooling wire (Y), a fan wire (G) or a separate cooling transformer (Rc) is not a match.

What’s in the Box and What You Need

The package should include the CT30 thermostat, a cover plate, two wall anchors and screws, a caution card, and wire labels. Tools the manual lists (p.1): a screwdriver, a hammer, a pencil, a drill bit (3/16-inch for drywall, 7/32-inch for plaster), and an optional level.

Installation Steps

  1. Turn off power at the heating system or the fuse/circuit-breaker panel. Take off the old cover and thermostat but leave the wallplate and wires in place (p.2).
  2. Check for mercury. If the old thermostat has a sealed tube with mercury, do not bin it; follow the Mercury Notice and your local disposal rules (p.2).
  3. Label and remove. Disconnect the wires one at a time and wrap each with the matching letter label. Ignore wire colors and use only the terminal letters. Remove the old wallplate once every wire is labeled (p.3).
  4. Mount the base. Mark the screw holes, drill (3/16-inch drywall, 7/32-inch plaster), tap in the anchors, and feed the wires through the base (pp.3,4).
  5. Connect the wires (see Wiring below), then set the adjustment lever (see below) and restore power (pp.4,5).

Wiring the CT30

Match each labeled wire to the terminal with the same letter, loosen the screw, wrap the bare wire around the terminal, and tighten (p.4). The CT30 has two terminals.

Terminal Accepts these old-thermostat letters
R R, RH, 4 or V
W W, W1 or H

If the old thermostat has a Y, G or Rc wire, the manual says to stop: this heat-only thermostat cannot use those, so it is the wrong model for that system (p.4). Any unused wire should be capped with tape and kept out of the wall opening.

Setting the Adjustment Lever

On the CT30, separate the cover from the body, remove the plastic insert, and use a pencil to move the adjustment lever to the setting for your heating system. This tunes how the thermostat cycles to your equipment (p.5):

Your system Lever setting
Gas or oil furnace, less than 90% efficiency 0.4
Electric furnace (any type) 0.3
High-efficiency furnace, more than 90% 0.8
Hot water system 0.8
Gas or oil steam or gravity system 1.2

Then align the three cover tabs with the slots and press until the cover snaps in, and restore power (p.5).

Operating the CT30

Operation is manual. Move the lever to raise or lower the desired indoor temperature; there is nothing to program (p.6). On the CT33, moving the lever to the far left turns the heating system off (p.6).

Specifications and Support

  • Type: low-voltage, heat-only, non-programmable thermostat.
  • Control: manual lever for temperature; a set adjustment lever for the furnace type.
  • Connection: two-wire hook-up (R and W).
  • Not for: systems with cooling, a fan wire, or three or more wires.
  • Related model: CT33, same guide, with an off position.
  • Warranty: 1-year limited; Honeywell Customer Care 1-800-468-1502, www.honeywell.com/yourhome (pp.7,8).

For exact dimensions and the wiring diagrams, use the manual; they are shown as figures rather than a spec list.

FAQ

Is the CT30 a programmable thermostat?

No. It is a non-programmable, heat-only model. You set the temperature by moving a lever, and there are no schedules to program.

How many wires does the CT30 need?

Two, not counting any C or C1 wire. If your old thermostat has three or more, the CT30 is probably not the right fit.

Can the CT30 control air conditioning or a fan?

No. It only has R and W terminals. A Y, G or Rc wire means you need a different thermostat.

What does the adjustment lever do?

It matches the thermostat to your furnace type. The manual gives values from 0.3 (electric) to 1.2 (steam or gravity), with 0.4 for a standard gas or oil furnace (p.5).

What is the difference between the CT30 and CT33?

Both are covered by the same guide. The CT33 adds a far-left lever position that turns the heating system off; the CT30’s distinguishing step is the adjustment-lever setting.

Honeywell Pro 3000 Series Non-Programmable Digital Thermostat Installation Manual

Honeywell Pro 3000 Series Non-Programmable Digital Thermostat Installation Manual

Download Honeywell Pro 3000 Series Installation Manual (PDF)

Table of Contents

What the Manual Covers

Page 1 labels the product a “Non-Programmable Digital Thermostat” from the “PRO 3000 Series” and lists two models: “TH3110D1008” and “TH3210D1004”. To find yours, “Turn thermostat over to find model number and date code.”

Page 8 carries the colophon: “© 2020 Resideo Technologies, Inc. All rights reserved.” It also adds, “The Honeywell Home trademark is used under license from Honeywell International, Inc. This product is manufactured by Resideo Technologies, Inc. and its affiliates.”

The English text runs pages 1–8 of a 24-page trilingual PDF; French (pages 9–16) and Spanish (pages 17–24) mirror the same layout. Nothing here programs a schedule.

Wallplate Mounting

Page 1 opens with, “Remove the wallplate from the thermostat by pulling from the bottom, then follow directions below for mounting.” The four steps are literal:

  • “Pull wires through wire hole.”
  • “Position wallplate on wall, level and mark hole positions with pencil.”
  • “Drill holes at marked positions as shown below, then tap in supplied wall anchors.”
  • “Place wallplate over anchors, insert and tighten mounting screws.”

Two drill bit sizes decide the job: 3/16-inch for drywall, 7/32-inch for plaster. The manual also asks you to tap the supplied anchors into the drilled holes before setting the wallplate back over them.

Pro 3000 Series Terminal Designations

Page 2 lists terminals per model. Read them once; every wiring row on page 3 references them by letter.

TH3110D terminals (page 2)
TerminalManual definition
Rc“24 Vac power from cooling transformer”
R“24 Vac power from heating transformer”
C“24 Vac common. For 2 transformer systems, use common wire from cooling transformer.”
W“Heat relay”
Y“Compressor contactor”
G“Fan relay”
O“Changeover valve energized in cooling”
B“Changeover valve energized in heating”

The TH3210D list on the same page keeps C, O, B, G, Y as printed, drops W, splits R into a single “24 Vac power” source (no Rc), and adds three posts unique to that board: Aux “Auxiliary heat relay”, E “Emergency heat relay”, and L “Sends output when set to Em. Heat”. TH3110D installation covers every conventional row; TH3210D is the two-stage heat-pump variant with auxiliary and emergency heat.

Wiring for Conventional Systems

Page 3 lays out seven configurations for Pro 3000 thermostat wiring; five are conventional systems on the TH3110D board. The bracketed numbers in the tables below refer to the nine notes collected in the Wiring Notes section. TH3110D installation covers all five conventional rows.

Conventional system configurations (page 3)
ConfigurationTerminals usedNotes
1H/1C System (1 transformer), TH3110DRc · R · W · Y · G · CR [R+Rc joined by jumper]; [1, 3]
1H/1C System (2 transformers), TH3110DRc · R · W · Y · G · C[1, 2, 3, 4]
Heat Only System, TH3110DRc · R · W · CR [R+Rc joined by jumper]; [1, 3]
Heat Only System with Fan, TH3110DRc · R · W · G · CR [R+Rc joined by jumper]; [1, 3]
Cool Only System, TH3110DRc · R · Y · G · CR [R+Rc joined by jumper]; [1, 3]

Wire gauge comes before the diagrams: “Wire specifications: Use 18- to 22-gauge thermostat wire. Shielded cable is not required.”

TH3210D Heat Pump Wiring

Page 3 also covers two heat pump configurations. The TH3110D handles 1H/1C heat pumps; TH3210D heat pump wiring is required for two-stage auxiliary heat.

Heat pump configurations (page 3)
ConfigurationTerminals usedNotes
1H/1C Heat Pump, TH3110DRc · R · W · Y · G · C · O · BR [R+Rc joined by jumper]; W [W+Y joined by jumper]; [1, 3, 5, 6, 7]
2H/1C Heat Pump, TH3210DR · Y · Aux · E · G · C · O · B · L[1, 3, 5, 8, 9]

On the 1H/1C row, W is not wired on its own — the manual prints it as a field jumper to Y. Pro 3000 Series terminal designations matter here: misreading W for Y2, or O for B, is the most common miswire.

Wiring Notes

Page 3 closes with nine numbered notes keyed to the diagrams:

  1. “Power supply. Provide disconnect means and overload protection as required.”
  2. “Remove jumper for 2-transformer systems.”
  3. “Optional 24 Vac common connection.”
  4. “Common connection must come from cooling transformer.”
  5. “Use either O or B terminals for changeover valve.”
  6. “Use a small piece of wire (not supplied) to connect W and Y terminals.”
  7. “Set fan operation switch to Heat Pump (see page 5) and configure system type for heat pump (see page 6).”
  8. “L terminal sends a continuous output when thermostat is set to Em. Heat. Connect to Honeywell Home zoning panels to switch the panel to Emergency Heat.”
  9. “Install field jumper between Aux and E if there is no emergency heat relay.”

Thermostat Mounting and the Fan Operation Switch

Page 4 walks you back onto the wallplate: “Align the 4 tabs on the wallplate with corresponding slots on the back of the thermostat.” then “Push gently until the thermostat snaps in place.” and finally “Plug wall opening with non- flammable insulation.”

The same page then sets the fan operation switch on the TH3110D board. Gas or oil installs leave it in the factory position: “For gas or oil heating systems, leave the fan operation switch in this factory-set position.” Heat pump or electric heat flips it: “Change the switch to this setting for heat pump or electric heat systems.”

Installer Setup

Page 5 lists seven Pro 3000 installer setup functions on the non-programmable board. To enter setup, press and hold both arrow keys until the display changes; the up key advances the function, the down key changes the setting, and both together exit and save.

Installer setup functions (page 5)
Func.SettingOptions
1System type (TH3110D only)0 Gas, oil or electric heat with air conditioning · 1 Heat pump (5 minute compressor off time in heating and cooling)
5Heating cycle rate (CPH), TH3110D only5 gas or oil under 90% · 1 steam or gravity · 3 hot water or 90%+ · 9 electric · others 2, 4, 6, 7, 8, 10, 11, 12
6Auxiliary heat cycle rate (CPH), TH3210D onlySame option list as function 5
8Emergency heat cycle rate (CPH), TH3210D only9 electric emergency · 1 steam or gravity · 3 hot water or 90%+ · 5 gas or oil under 90% · others 2, 4, 6, 7, 8, 10, 11, 12
9Compressor cycle rate (CPH)3 Recommended for most compressors · other options 1, 2, 4, 5, 6
14Temperature display0 Fahrenheit · 1 Celsius
15Compressor protection5 Five-minute compressor off time · other options 0, 1, 2, 3, 4

Function 15 has a plain-language description on the same page: “Forces the compressor to wait a few minutes before restarting, to prevent damage. During the wait time, the message Cool On or Heat On (heat pumps only) will flash on the display.”

Because the PDF’s text layer drops bold, every option above is listed unmarked. The printed manual marks factory settings in bold on page 5; consult the paper copy before changing anything.

Installer System Test

Page 6 walks the installer through a four-number system test. To start, “Set SYSTEM switch to Heat.” and press the down arrow to bring each system online against the table below; press again until systems turn off. The TH3210D adds one more pass: “Set SYSTEM switch to Em Heat and repeat steps 2-3 above (TH3210D only).” Cool repeats the same cycle. Holding both arrow keys together ends the test at any time.

System test numbers and status codes (page 6)
TestSystemStatus codes
10Heating system0 Heat and fan off · 1 Heat turns on · 2 Auxiliary heat turns on (TH3210D only)
20Emergency heat0 Heat and fan off · 1 Heat and fan turn on · 2 Auxiliary heat turns on
30Cooling system0 Compressor and fan off · 1 Compressor and fan turn on
70Thermostat information (for reference only)71–72 software revision major / minor · 73–74 configuration identification major / minor · 75–76 production date code week / year

Page 8 pairs the test with a warning: “CAUTION: EQUIPMENT DAMAGE HAZARD Compressor protection is bypassed during testing. To prevent equipment damage, avoid cycling the compressor quickly.”

Troubleshooting

Page 7 is a six-symptom checklist. “Most problems can be corrected quickly and easily.”

  • Blank display — check the circuit breaker, the power switch at the heating and cooling system, the furnace door, and that “fresh AA alkaline batteries are correctly installed (see page 2)”.
  • Heat or cool does not respond — set SYSTEM to the matching mode, verify the setpoint is above (heat) or below (cool) the indoor temperature, then “Wait 5 minutes for the system to respond.”
  • Setpoint does not change — the manual prints the accepted range as Heat “40° to 90°F (4.5° to 32°C)” and Cool “50° to 99°F (10° to 37°C)”.
  • Cool On or Heat On flashes — “Compressor protection feature is engaged. Wait 5 minutes for the system to restart safely, without damage to the compressor.”
  • Cool On absent — set the System switch to Cool, set the temperature below current room temperature.
  • Heat On absent — set the System switch to Heat, set the temperature above current room temperature.

Specifications

Page 7’s specifications block prints these ratings:

  • Temperature ranges: Heat 40° to 90°F (4.5° to 32°C); Cool 50° to 99°F (10° to 37°C)
  • Operating ambient: 32° to 120°F (0° to 48.9°C)
  • Shipping: -20° to 120°F (-28.9° to 48.9°C)
  • Humidity: 5% to 90% (non-condensing)
  • Dimensions: 3-13/16 in. H x 5-3/8 in. W x 1-1/4 in. D (97 mm H x 137 mm W x 32 mm D)
  • Input: 24 V~ @ 60 Hz, 1.0 A
Electrical ratings (page 7)
SystemVoltage (50/60 Hz)Running current
Heat (1st stage)20-30 Vac0.02-1.0 A
(Powerpile)750 mV DC100 mA DC
Emergency heat20-30 Vac0.02-1.0 A
Auxiliary heat20-30 Vac0.02-1.0 A
Cooling20-30 Vac0.02-1.0 A

Safety Notices

Page 8 stacks four cautions at the foot of the guide. “CAUTION: ELECTRICAL HAZARD Can cause electrical shock or equipment damage. Disconnect power before beginning installation.” The equipment-damage caution quoted above appears again here, alongside the mercury and e-waste notices that follow.

Two more notices round out the safety page: “If this product is replacing a control that contains mercury in a sealed tube, do not place the old control in the trash.” — the mercury notice — and “The product should not be disposed of with other household waste. Check for the nearest authorized collection centers or authorized recyclers.” — the electronic waste notice.

Support contact on the same page: “For assistance with this product, please visit customer.resideo.com. Or call Customer Care toll-free at 1-800-468-1502.”

FAQ

Which Pro 3000 model is right for my system?

TH3110D1008 covers conventional 1H/1C and 2H/2C installations plus 1H/1C heat pumps using its W and Y terminals. TH3210D1004 adds a dedicated Aux relay and E (emergency heat) terminal for 2H/1C heat pumps with a backup heat source.

Do I need a C wire on the Pro 3000?

The manual describes C as “Optional 24 Vac common connection”, with two-transformer systems using the cooling side: “For 2 transformer systems, use common wire from cooling transformer.” Batteries provide primary or backup power if C is not run.

What does the L terminal do on the TH3210D?

Per wiring note [8], the L post is used for Honeywell Home zoning panels: it sends a continuous output when the thermostat is set to Em Heat, which lets the panel switch to emergency-heat operation.

How do I set up a heat pump on the Pro 3000?

Two switches cooperate. First, set the physical fan operation switch on the TH3110D board to Heat Pump (page 4). Then, in Pro 3000 installer setup, set function 1 to 1 so the thermostat knows to run 5-minute compressor off time in both heating and cooling.

Why won’t my thermostat turn on?

Work through the page 7 checklist. “Display is blank” starts with the circuit breaker and the “power switch at heating & cooling system”. Confirm the furnace door is shut, then check that “fresh AA alkaline batteries are correctly installed”.

What temperature range can the Pro 3000 be set to?

Heat settings run 40° to 90°F (4.5° to 32°C). Cool settings run 50° to 99°F (10° to 37°C). Setpoints outside these bounds simply won’t accept a change.

Honeywell CT2800 Programmable Thermostat installation instructions

Honeywell CT2800 Programmable Thermostat installation instructions 

These notes follow the official Honeywell CT2800 Programmable Thermostat installation instructions (document 69-1638) so you can install, wire and program this weekday/weekend thermostat without guessing. The CT2800 is a 5-2 day, single-stage model, so the compatibility check and the DIP-switch setup matter. Every step below is taken from the printed document and labeled with its step number, and the PDF is linked here. Work with the power off and confirm the manual against your own system.

Download the official Honeywell CT2800 Installation Instructions (PDF)

Table of Contents

What the CT2800 Is

The CT2800 is a digital, wall-mounted programmable thermostat for a low-voltage (20 to 30 VAC) central heating and/or cooling system. Its key traits, straight from the document:

  • Weekday/Weekend (5-2 day) programming. One schedule for Monday to Friday, a separate one for Saturday and Sunday.
  • Up to four periods a day. Wake, Leave, Return and Sleep on weekdays; Wake and Sleep on weekends.
  • Single-stage heat and/or cool. It controls one stage of heating and one stage of cooling.
  • Two AA alkaline batteries. They power the clock and program.

Step 0: Check Compatibility First

The instructions open with a compatibility chart, because the CT2800 only fits certain systems. If yours is not listed as compatible, the chart names an alternate Honeywell model instead (Step “Verify You Have Correct Thermostat”).

Heating/Cooling systemCompatible?Alternate model
Conventional: single-stage warm-air furnace or hot waterYes—
Electric baseboard heat (120 to 240V)NoCT1950 (240V)
Steam boiler with radiatorsNoCT3600
Heat pump (no auxiliary/backup heat)NoCT3600
Multistage heat pump (with auxiliary/backup heat)NoCT3611
Multistage conventional (more than one stage)NoSee a contractor

Read this carefully: the CT2800 is not for heat pumps, steam, line-voltage electric baseboard, or multistage systems. If a label such as O, B, W2, H2 or Y2 is on your old thermostat, the instructions stop the installation and point you to an alternate model.

Before You Start

  • You need two AA alkaline batteries (Honeywell recommends Energizer), a screwdriver, a drill with a 3/16-inch or 7/32-inch bit, a pencil, a level, wire cutter/stripper, and electrical tape.
  • Confirm your heating and cooling equipment works first. A pre-existing problem can outlive the new thermostat.
  • Do not run cooling when the outdoor temperature is below 50°F (10°C), which can damage the compressor.
  • If your old thermostat contains mercury in a sealed tube, the document’s Mercury Notice requires you to recycle it, not bin it.

Installing the Thermostat

The document walks through numbered steps. In order:

  1. Step 2, remove the old thermostat. Turn off power at the furnace or the fuse/circuit-breaker panel. Take off the old cover and mounting plate without disconnecting the wires, then label each wire with the terminal letter (not the color). If the old unit has a C/C1 clock wire, six or more wires, only three wires, five wires, or unused extra wires, jump to the special-wiring notes first.
  2. Step 3, mount the plate. Separate the plate from the body with a coin, level it, mark the holes, and drill (3/16-inch for drywall, 7/32-inch for plaster or wood). Tap in the anchors for drywall, feed the wires through, and tighten the screws.
  3. Step 4, set it for your heating type. Use the FUEL switch on the back for F (gas/oil) or E (electric), then set DIP switches 1 and 2 per the heating-system table (default 1-On/2-On is for a standard warm-air gas/oil furnace; 1-Off/2-On for high-efficiency or hot water; 1-On/2-Off for electric). Turn DIP switch 3 to Off if you want Celsius instead of Fahrenheit.
  4. Step 6, mount. Line up the top tabs and snap the bottom in.
  5. Step 7, batteries. With the System switch Off, insert two AA alkaline batteries with correct polarity. The display lights up with a flashing time, meaning it is ready to program.

Wiring the CT2800

Step 5 matches each labeled wire to the terminal with the same letter on the back of the thermostat. The CT2800 uses five terminals.

TerminalWhat it does
RPower (heating transformer)
RcPower for cooling
WHeat call
YCooling call
GFan

The instructions also state:

  • No C wire. The CT2800 does not use the C terminal. Tape off any unused or clock (C/C1) wires so they cannot touch.
  • R / Rc jumper. A metal jumper sits between R and Rc out of the box. Leave it for a single-transformer system; remove it only for a five-wire system, then run each power wire to its own terminal.
  • Old labels that differ. The cross-reference table maps old terminals such as R, RH, 4 or V to the new R; Rc or R to Rc; W, W1 or H to W; Y or Y1 to Y; and G or F to G. A wire on O or B, or on W2, H2 or Y2, means stop and use another model.

Programming the Weekday/Weekend Schedule

Heating and cooling are programmed separately. Set the System switch to Heat for the heating schedule, then to Cool for the cooling schedule. To start, press SCHEDULE; use the Time buttons to set a period’s time and the Temp buttons to set its temperature, then advance to the next period. Set the weekday periods (Wake, Leave, Return, Sleep), then the weekend (Wake, Sleep), and press RUN to finish.

The document supplies suggested values. For heating: Wake 6:00 AM 70°F (21°C), Leave 8:00 AM 62°F (16.5°C), Return 6:00 PM 70°F, Sleep 10:00 PM 62°F. For cooling: Wake 6:00 AM 78°F (25.5°C), Leave 8:00 AM 85°F (29.5°C), Return 6:00 PM 78°F, Sleep 10:00 PM 82°F (28°C).

A few rules from the text: setpoints cannot go below 45°F (7°C) or above 88°F (31°C); if you skip programming it, the thermostat runs heating at 68°F (20°C) and cooling at 78°F (26°C) around the clock; and an unprogrammed weekend keeps the weekday Sleep temperature until Monday’s Wake.

Controls and Overrides

  • System switch. Cool, Off or Heat.
  • Fan switch. Auto runs the fan only during heating or cooling; On runs it continuously.
  • Temporary override. Press Temp warmer or cooler; a TEMPORARY arrow shows and the change lasts until the next period.
  • Permanent hold. Press HOLD; “HLd” appears and the temperature is held until you cancel with RUN. Use it for a vacation.
  • Check programs. Press SCHEDULE repeatedly to review times and temperatures; press RUN to resume.

The display shows a SYSTEM ON arrow whenever the thermostat is calling for heating or cooling.

In Case of Difficulty

This is the document’s own “If… Then…” list. It is short and specific, so read it before deciding the thermostat is defective.

IfThen (what the manual says)
Display does not come onConfirm fresh batteries are installed correctly; if not, set System to Off, insert the batteries backward for 5 to 10 seconds, then reinstall them the right way.
Flashing “bAt Lo”Batteries are low. Replace them; if it continues, repeat the backward-insert reset.
Setpoint stops at 45°F or 88°FYou hit the programming limit; the range is 45°F to 88°F (7–31°C).
Temperature changes at the wrong timeRecheck that period’s AM/PM, and the current day and time.
Heat or cool will not startSet the System switch correctly, check the fuse/breaker and connections, replace batteries if blank, and allow the built-in cooling delay (about 5 to 10 minutes) before the compressor starts.
Furnace short-cyclesAdjust the anticipator screws on the back of the thermostat.
Displayed room temperature looks off by about 1°Seal the wall hole to stop drafts; small differences are normal and can last up to 30 minutes during recovery.

Specifications

  • Programming: Weekday/Weekend (5-2 day); up to four weekday periods and two weekend periods.
  • System control: Single-stage heat and/or cool.
  • Voltage: 20 to 30 VAC low-voltage systems.
  • Setpoint range while programming: 45°F to 88°F (7°C to 31°C).
  • Unprogrammed default: heat 68°F (20°C), cool 78°F (26°C).
  • Cooling delay: built-in, about 5 to 10 minutes.
  • Power: two AA alkaline batteries.
  • Terminals: R, Rc, W, Y, G; C is not used.
  • Not compatible with: heat pumps, steam, multistage systems, and 120/240V electric baseboard.
  • Warranty: 1-year limited (excludes battery); Honeywell Customer Care 1-800-468-1502.

FAQ

How long is the CT2800 installation?

The document lists seven steps: prepare, remove the old unit, mount the plate, set the fuel and DIP switches, wire, mount the body, and install the batteries, then program the schedule.

Which terminals does the CT2800 use?

R, Rc, W, Y and G. It does not use a C wire, and a pre-installed jumper links R and Rc unless you have a five-wire system.

Can I install the CT2800 on a heat pump?

No. Its compatibility chart lists heat pumps, steam, multistage systems and 120/240V electric baseboard as not compatible, and points to models such as the CT3600 instead.

What do the DIP switches do?

DIP switches 1 and 2 set the heating-system type and the FUEL switch sets gas/oil (F) or electric (E). DIP switch 3 changes the display between Fahrenheit and Celsius.

What happens if I never program it?

It runs a fixed default: heating at 68°F (20°C) and cooling at 78°F (26°C) all day, per the instructions.

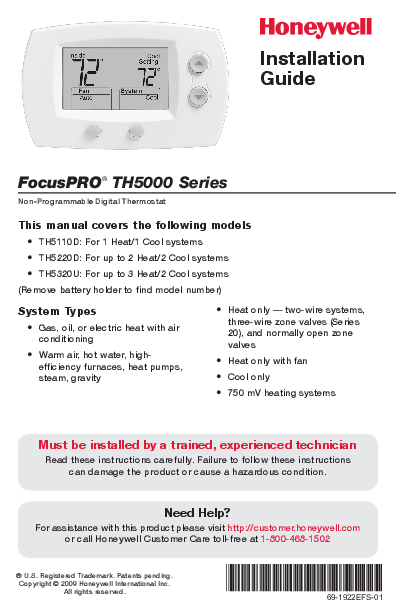
Honeywell FocusPRO TH5000 Series Installation Manual

Honeywell FocusPRO TH5000 Series Installation Manual

This Honeywell FocusPRO TH5000 Series Installation Manual guide is for the technician with a non-programmable FocusPRO on the bench and a cable of unknown parentage coming out of the wall. Every terminal list, wiring note, setup function and rating below is quoted from the guide, with the page number attached.

It is eight English pages long and assumes you already know what a transformer does. What you get is a model-to-system map, fourteen wiring configurations, twelve numbered notes and an installer setup table. Read it as a lookup sheet, not a tutorial.

Download Honeywell FocusPRO TH5000 Series Installation Manual (PDF)

Table of Contents

Models and System Types

Page 1 labels the product a “Non-Programmable Digital Thermostat” and names its audience: “Must be installed by a trained, experienced technician”. The warning that follows is why you read the pages — “Failure to follow these instructions can damage the product or cause a hazardous condition.”

The footer document id is 69-1922EFS—03, and page 8 carries “© 2020 Resideo Technologies, Inc. All rights reserved.” — the series is sold through Resideo.

“This manual covers the following models”, and the split is by staging capacity rather than features:

  • “TH5110D: For 1 Heat/1 Cool systems”
  • “TH5220D: For up to 2 Heat/2 Cool systems”
  • “TH5320U: For up to 3 Heat/2 Cool systems (Remove battery holder to find model number)”

Shaded areas in the wiring pages “apply only to TH5320U/TH5220D or as otherwise noted”, so the model decides which rows are live. For FocusPRO TH5110D installation the board carries only Rc, Y, W, G, R and C.

Six system types are in scope: “Gas, oil, or electric heat with air conditioning”, “Warm air, hot water, high-efficiency furnaces, heat pumps, steam, gravity”, “Heat only — two-wire systems, three-wire zone valves (Series 20), and normally open zone valves”, then “Heat only with fan”, “Cool only” and “750 mV heating systems”.

Before You Install

Page 2 leads with a “CAUTION: ELECTRICAL HAZARD” that “Can cause electrical shock or equipment damage. Disconnect power before beginning installation.” The mercury notice covers whatever you just removed: “If this product is replacing a control that contains mercury in a sealed tube, do not place the old control in the trash.”

Wallplate work is “Separate wallplate from thermostat.”, then “Mount wallplate as shown below.”, with hole sizes that depend on the wall: “Drill 3/16” holes for drywall. Drill 7/32” holes for plaster.”

Power options come from page 3: “Connect C for primary AC power (optional if batteries are installed).”, “Insert batteries for primary or backup power.” and “Remove factory-installed jumper only for two-transformer systems.” Page 5 closes the mechanical job — align the four wallplate tabs, “push gently until the thermostat snaps in place.”, then “Plug wall opening with non-flammable insulation.”

Terminal Designations

Page 3 defines the terminals twice: conventional, then heat pump.

Conventional terminals (page 3)
TerminalManual definition
Rc“24VAC power from cooling transformer”
R“24VAC power from heating transformer”
W / W2“Heat relay (stage 1)” / “Heat relay (stage 2)”
Y / Y2“Compressor contactor (stage 1)” / “Compressor contactor (stage 2)”
G“Fan relay”
C“24VAC common. For 2 transformer systems, use common wire from cooling transformer.”

The heat pump list keeps those Rc, R, G and C definitions, calls Y simply “Compressor contactor”, and replaces the heat relays with O/B “Changeover valve” plus Aux “Auxiliary heat relay*”, E “Emergency heat relay*” and L “Sends output when set to Em. Heat”. The asterisk reads “*Aux and E terminals combined on TH5320U only.”

Conventional Wiring Diagrams

Page 4 is the TH5000 series wiring diagram for conventional equipment: nine configurations. Wire gauge comes first — “Use 18- to 22-gauge thermostat wire. Shielded cable is not required.” Every single-transformer row prints Rc “Power [1]” with R “[R+Rc joined by jumper]”; the two-transformer rows print Rc “Power (cooling transformer) [1, 2]” with R “Power (heating transformer) [1, 2]”. W, W2, Y, Y2 and G take their page 3 definitions, C is “24VAC common” plus its note, and exceptions go in the last column.

Conventional system configurations (page 4)
ConfigurationTerminalsCommon note and exceptions
1H/1C System (1 transformer)Rc R Y C W GC [3]
1H/1C System (2 transformers)Rc R Y C W GC [3, 4]
2H/2C System (1 transformer) [6]Rc R Y C W G W2 Y2C [3]
2H/2C System (2 transformers) [6]Rc R Y C W G W2 Y2C [3, 4]
Heat-only SystemRc R C WC [3]
Heat-only System with FanRc R C W GC [3]
Heat-only System (Series 20) [5]Rc R Y C WR “Series 20 valve terminal “R” [1]”; Y “Series 20 valve terminal “W””; W “Series 20 valve terminal “B””
Heat-only System (normally open zone valve) [5]Rc R Y CR “Power [1]”; Y “Normally open zone valve”
Cool-only SystemRc R Y C GY “Compressor contactor”

Notes [2] to [7], [11] and [12] sit at the foot of page 4 and read as instructions.

Wiring notes (page 4)
NoteText
[2]“Remove jumper for 2-transformer systems.”
[3]“Optional 24VAC common connection.”
[4]“Common connection must come from cooling transformer.”
[5]“In Installer Setup, set system type to Heat Only.”
[6]“In Installer Setup, set system type to 2Heat/2Cool Conventional.”
[7]“In Installer Setup, set changeover valve to O or B.”
[11]“L terminal sends a continuous output when thermostat is set to Em. Heat. Connect to zoning panels to switch the panel to Emergency Heat.”
[12]“Install field jumper between Aux and E if there is no emergency heat relay.”

Notes [8] to [10] are the heat pump equivalents, each starting “In Installer Setup, set system type to” followed by 2Heat/1Cool, 2Heat/2Cool or 3Heat/2Cool Heat Pump. On a TH5220D 2 heat/2 cool wiring job note [6] is not optional; the system type is what picks the output logic.

Heat Pump Wiring Diagrams

Page 5 says “See [notes] on page 4.” Its five configurations use O/B for the changeover valve, which is why note [7] exists, and all keep the same Rc “Power [1]”, R “[R+Rc joined by jumper]”, Y “Compressor contactor”, C “24VAC common [3]”, O/B “Changeover valve [7]” and G “Fan relay” lines. L always “Sends output when set to Em. Heat [11]”, and the table lists only what each row adds. This is the TH5320U heat pump wiring page for three-stage jobs.

Heat pump configurations (page 5)
ConfigurationTerminals added to the shared sixTheir connections
1H/1C Heat Pump Systemnone—
2H/1C Heat Pump System (TH5220D only) [8]Aux, E, LAux “Auxiliary heat relay [12]”; E “Emergency heat relay [12]”
2H/1C Heat Pump System (TH5320U only) [8]Aux/E, LAux/E “Auxiliary/Emergency heat relay”
2H/2C Heat Pump System (TH5320U only) [9]Y2, LY2 “Compressor contactor (stage 2)”
3H/2C Heat Pump System (TH5320U only) [10]Aux/E, Y2, LAux/E “Auxiliary/Emergency heat relay”; Y2 “Compressor contactor (stage 2)”

Installer Setup Functions

Installer setup is how the FocusPRO TH5000 installer setup list matches the board to the equipment you wired. Page 6 starts it by holding the down arrow key with FAN “until the display changes.” Inside the menu, “Press NEXT to advance to the next function. Press DONE to exit and save settings.” Its own purpose line covers preference too: “customize feature operation as desired.”

The header reads “Settings & options (factory default in bold)”. Bold does not survive text extraction, so options below are listed in print order and left unmarked; check your paper copy. Function 1, system type, comes first.

Setup function 1 — system type (page 6)
ValueOption text
0“1 heat/1 cool conventional”
1“1 heat/1 cool heat pump (no aux. heat)”
2“Heat only — 2-wire systems, 3-wire zone valves (Series 20), and normally open zone valves”
3“Heat only with fan”
4“Cool only”
5“2 heat/1 cool heat pump (with aux. heat)”
6“2 heat/2 cool conventional”
7“2 heat/1 cool conventional”
8“1 heat/2 cool conventional”
9“2 heat/2 cool heat pump (no aux. heat) – TH5320U only”
10“3 heat/2 cool heat pump (with aux. heat) – TH5320U only”

Functions 2, 3 and 12 set changeover and fan behaviour. Function 2 offers “Changeover valve (O/B terminal energized in cooling)” and “Changeover valve (O/B terminal energized in heating)”, which is note [7] in the flesh. Function 3 offers “Gas or oil furnace — equipment controls fan in heating” and “Electric furnace — thermostat controls fan in heating”. Function 12 offers “Manual changeover (Heat/Cool/Off)”, auto changeover, or “Auto changeover only (Auto)”.

Functions 5 to 8 set heating cycle rates: stage 1 heat, “Stage 2 heat cycle rate/Auxiliary heat cycle rate (CPH)”, auxiliary heat (marked “Only TH5320U for 3H/2C Heat Pumps”) and emergency heat. Functions 5 to 7 share these option texts: “For gas or oil furnaces of less than 90% efficiency”, “For steam or gravity systems”, “For hot water systems & furnaces of over 90% efficiency” and “For electric furnaces”; function 8 swaps the last for “For electric emergency heat”.

Functions 9 and 10, the compressor rates, offer “Recommended for most compressors”, and the footnotes allow “Other cycle rate options: 2, 4, 6, 7, 8, 10, 11 or 12 CPH”.

The rest are display and limits: 14 selects “Fahrenheit” or “Celsius”; 15 sets the “Five-minute compressor off time”; 26 is auxiliary heat control; 27 and 28 are the range stops, “Max. heat temperature setting is 90 °F (32 °C)” and “Min. cool temperature setting is 50 °F (10 °C)”. Page 8 expands function 26: Comfort means “The thermostat will prioritize comfort over economy”, while Economy means “The thermostat will attempt to reach the temperature setting without activating the auxiliary heat.”

Installer System Test

The test runs from page 7, where “Press NEXT to advance to next test. Press DONE to terminate system test.” The caution is why you do not run it casually: “Compressor protection is bypassed during testing. To prevent equipment damage, avoid cycling the compressor quickly”.

Tests are 10 heating, 20 emergency heat, 30 cooling and 40 fan; status 0 turns each off, status 1 runs “Stage 1 heat turns on. Fan turns on if Setup Function 1 is set to 1, 5, 9 or 10 OR Setup Function 3 is set to 1”, and the top stage on a heat pump is “Stage 3 heat turns on – TH5320U only”.

Specifications and Parts

The TH5000 series specifications sit on page 8 with the part list, prefaced by “Please contact your distributor to order replacement parts.” Cover plates are for the wall you uncovered — “Use to cover marks left by old thermostats.”

Battery holders are 50000951-001 (TH5110D) and 50007072-001 (TH5320U/TH5220D); cover plate assemblies are 50001137-001 and 50002883-001, also sold in 12-packs as 50007297-001 and 50007298-001.

Specifications (page 8)
ItemValue
Temperature rangesHeat: “40° to 90°F (4.5° to 32°C)”; Cool: “50° to 99°F (10° to 37°C)”
Operating ambient temperature“32° to 120°F (0° to 48.9°C)”
Shipping / humidity“-20° to 120°F”; “5% to 90% (non-condensing)”
DimensionsTH5220D “91 mm H x 147 mm W x 38 mm D”; TH5110D “86 mm H x 114 mm W x 33 mm D”
Electrical ratings, WHeating, “20-30 Vac”, “0.02-1.0 A (Powerpile)”; “750 mV DC”, “100 mA DC”
Electrical ratings, W2“(Aux) Heating”, “20-30 Vac”, “0.02-0.5 A”
Electrical ratings, Y and Y2Cooling, “20-30 Vac”, “0.02-1.0 A”
Electrical ratings, G, O/B, LFan / changeover / output, “20-30 Vac”, “0.02-0.5 A”
Electrical ratings, EEmergency heat, “20-30 Vac”, “0.02-1.0 A”

Page 8 closes with an electronic waste notice: “The product should not be disposed of with other household waste.” It gives no dimensions for the TH5320U, and it never mentions Wi-Fi or a program schedule in these eight pages.

FAQ

Which FocusPRO model do I need for two heating and two cooling stages?

Either larger board — “TH5220D: For up to 2 Heat/2 Cool systems”, or the TH5320U for three heat stages. The TH5110D has no W2 or Y2.

Do I have to connect a C wire?

No. “Connect C for primary AC power (optional if batteries are installed).”, and note [3] calls it an “Optional 24VAC common connection.”

When does the factory jumper between R and Rc come off?

Only on two-transformer jobs: “Remove jumper for 2-transformer systems.” There note [4] makes the common mandatory — “Common connection must come from cooling transformer.”

How is a Series 20 zone valve wired?

R, Y and W go to the valve’s R, W and B terminals, jumper left in place. Note [5]: “In Installer Setup, set system type to Heat Only.”

My heat pump’s auxiliary and emergency heat share one relay. Now what?

Note [12]: “Install field jumper between Aux and E if there is no emergency heat relay.” On the TH5320U they are already one terminal.

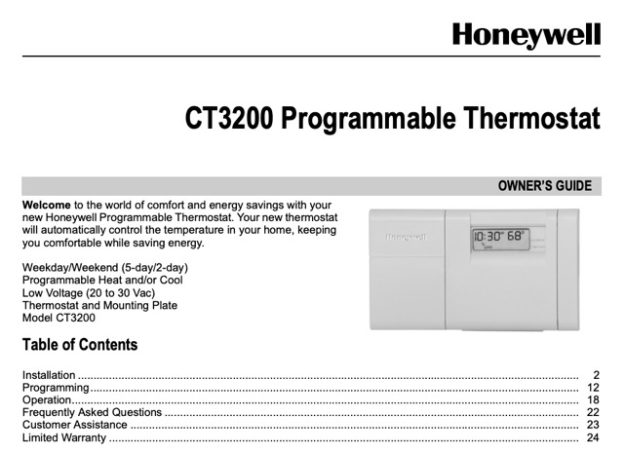
Honeywell CT3200 programmable thermostat Owner's Manual

Honeywell CT3200 programmable thermostat Owner’s Manual

This page summarizes the Honeywell CT3200 programmable thermostat Owner’s Manual (Owner’s Guide 69-1631) so you can install, program and fix this weekday/weekend thermostat without hunting through the PDF. The CT3200 is a 5-2 day programmable model for a single-stage heating and/or cooling system, and it is not the same as a 7-day thermostat. Every step below is drawn from the official document and noted with its section, and the manual PDF is linked here. Check it against your own system before you touch any wiring.

Download Honeywell CT3200 Owner’s Manual (PDF)

Table of Contents

What the CT3200 Is

The CT3200 is a digital, wall-mounted, low-voltage (20 to 30 VAC) programmable thermostat for a home’s heating and/or cooling system. Honeywell’s own description of it:

  • Weekday/Weekend (5-2 day) programming. One schedule for Monday to Friday and a separate one for Saturday and Sunday.
  • Four periods per day. Wake, Leave, Return and Sleep, each with its own temperature.
  • Heat and/or Cool control. It runs a single stage of heating and a single stage of cooling.
  • Two AA alkaline batteries. They back up the clock and program; the unit is powered by your low-voltage system.

Because it is a single-stage thermostat, it is not for multistage or variable-speed systems. Honeywell’s compatibility table lists alternate models if yours does not fit.

Is the CT3200 Right for Your System?

The Owner’s Guide starts with a compatibility check, because a programmable thermostat only works on the systems it is designed for (Step 1: Identify your system). It suits conventional 24-volt systems, including:

  • Single-stage warm-air furnace, with or without central air conditioning.
  • Hot-water or steam heat with a single stage.
  • Central cooling on a matching 24V system.
  • Heat pumps with single-stage heating and no electric auxiliary heat.

The guide then calls out cases that need attention before you install (Special wiring): a three-wire heating-only system, five-wire systems, and leftover wires not connected to the old thermostat. If your setup matches one of those, follow the guide’s special instructions or call a heating contractor; do not guess at the terminals.

To confirm the CT3200 is a fit, use the manual’s compatibility table. If the table points to a different model for your system, do not install this one.

Before You Install

The manual’s installation sequence begins with safety. Follow it in order (Step 1 and Step 2):

  1. Turn off power to the heating/cooling system at the furnace switch or the fuse/circuit-breaker panel.
  2. Remove the old thermostat’s cover and mounting plate without disconnecting the wires.
  3. Inspect the wiring. If the old thermostat has a C or C1 terminal wire, six or more wires, exactly three wires, five wires, or loose unused wires, stop and use the guide’s special-wiring instructions.
  4. Label each wire with the letter of the terminal it connects to on the old thermostat, using the enclosed labels. Label by terminal letter, not by wire color.

If your old thermostat contains mercury, the guide requires you to recycle it rather than place it in household trash (Mercury Notice).

Wiring the CT3200

The CT3200 has five terminals and does not use C. The table matches the manual’s wiring diagram (Step 7). Connect each labeled wire to the terminal with the same letter.

Terminal What it does
R 24V power for heating
Rc 24V power for cooling
W Heat call
Y Cool call
G Fan

The guide also notes:

  • C terminal. This thermostat does not use the C wiring terminal. If a C or C1 wire is present, tape it off and keep it clear of the new unit.
  • R/Rc jumper. A metal jumper is pre-installed between R and Rc. On a single-transformer system leave it; on a five-wire system (separate heating and cooling power), remove the jumper and run each power wire to its own terminal.
  • Old terminals that do not match. The guide includes a cross-reference table so wires from old terminals such as R, Rh, 4 or V map correctly to the new R and Rc. Use that table instead of assuming.

Programming the Weekday/Weekend Schedule

The CT3200 stores two schedules: a weekday set (Monday to Friday) and a weekend set (Saturday and Sunday), each with four periods. Heating and cooling are programmed separately, so set the System switch to Heat for the heating program and Cool for the cooling program. The general flow from the guide is:

  1. Press PROGRAM to start, then advance to the period you want (Wake, then Leave, Return and Sleep).
  2. Set the period’s time, then set its temperature.
  3. Repeat for each period. When a period is left blank, the thermostat uses the previous period’s temperature.
  4. Move between the weekday and weekend schedules. Once the first schedule is set, the guide lets you copy it to the next day or period to save time.
  5. Press RUN to save and return to normal operation.

The guide prints suggested start times and temperatures. For cooling they are Wake 6:00 AM 78°F (25.5°C), Leave 8:00 AM 85°F (29.5°C), Return 6:00 PM 78°F (25.5°C) and Sleep 10:00 PM 82°F (28°C); a parallel table gives the heating suggestions. Shift the numbers to your own day.

Controls You Use Every Day

  • System switch. Set to Heat, Cool or Off.
  • Fan switch. Set to Auto (fan runs only during heating or cooling) or On (fan runs continuously).
  • Raised or lowered temperature. Press the up/down arrows to change the current setting; this places the thermostat in a temporary hold until the next scheduled period, then the program resumes.
  • Permanent hold. To keep a temperature indefinitely, press and hold as the guide describes; press RUN to return to the schedule.
  • Check programs. Press PROGRAM repeatedly to review the times and temperatures you set; press RUN when done.

When the thermostat is actively calling for heating or cooling, the display shows a SYSTEM ON arrow.

Resetting the Thermostat

For a blank or confused display, the guide’s FAQ gives a reset rather than a button combination: set the System switch to Off, remove the batteries, then insert them backward (reversed polarity) for five to ten seconds and reinstall them the correct way. The display should come back on and you will need to set the time, day and schedule again. This is the manual’s stated reset method for this model.

Troubleshooting (From the Manual)

This is the “If… Then…” list from the guide’s Frequently Asked Questions (pp.22–23). Run through it before assuming the thermostat is bad.

Problem What the manual says to do
Display does not come on Make sure the batteries are fresh and installed correctly; if not, use the reversed-battery reset.
“bAt Lo” flashes Batteries are low. Replace them; if it still appears, do the reversed-battery reset.
Setpoint will not go below 45°F (7°C) or above 88°F (31°C) You have reached the programming limit; the range is 45°F to 88°F.
Temperature changes at the wrong times Check the AM/PM and the day/time for that period and reprogram if needed.
Heat does not come on Set System to Heat; check the fuse/breaker and connections; if blank or “bAt Lo”, replace batteries; allow time for the furnace to start.
Cool does not come on Set System to Cool; check fuse/breaker and connections; the thermostat has a built-in delay, so allow 5 to 10 minutes before the AC starts.
House too warm or too cool Press RUN/PROGRAM to check the current setpoint and change it if needed.
Furnace short-cycles Adjust the anticipator screws on the back of the thermostat (heat anticipator per the guide).
Display differs from setting by more than about 1° Seal the wall wire hole to stop drafts; some difference is normal, and during recovery setting and room temperature can differ for up to 30 minutes.

Specifications

  • Programming: Weekday/Weekend (5-2 day), four periods per day (Wake, Leave, Return, Sleep).
  • System control: Single-stage heat and/or cool; 24V low-voltage systems (20 to 30 VAC).
  • Setpoint range while programming: 45°F to 88°F (7°C to 31°C).
  • Cooling delay: built-in compressor protection of about 5 to 10 minutes.
  • Power: System-powered; two AA alkaline batteries back up clock and program.
  • Terminals: R, Rc, W, Y, G; C is not used.
  • Not compatible with: multistage or variable-speed systems, and millivolt (750 mV) gas-fire systems unless the compatibility table says otherwise.
  • Warranty: 1-year limited (excludes battery). Honeywell Customer Care 1-800-468-1502.

For exact dimensions and mounting, use the manual; they are not printed as a spec in the Owner’s Guide.

FAQ

Is the CT3200 a 7-day programmable thermostat?

No. It is a weekday/weekend (5-2 day) model: one schedule for Monday to Friday and a separate one for the weekend, with four periods each day.

Does the CT3200 need a C wire?

No. The guide states this thermostat does not use the C terminal. If a C or C1 wire is present, tape it off.

How many batteries does it use?

Two AA alkaline batteries. They preserve the clock and program. A flashing “bAt Lo” means they are low.

How do I reset a CT3200 with a blank display?

Set the System switch to Off, take out the batteries, insert them backward for five to ten seconds, then reinstall them the correct way and reset the time, day and schedule.

Why is the air conditioner slow to start?

The CT3200 has a built-in compressor delay; the manual tells you to allow 5 to 10 minutes after changing the setting before the cooling starts.

What temperature range can I set while programming?

Between 45°F (7°C) and 88°F (31°C); the display will not go beyond those limits during setup.

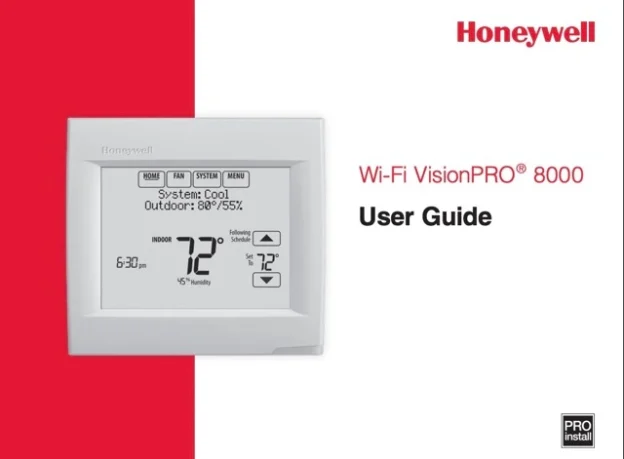
Honeywell TH8321WF1001 Wi-Fi VisionPRO thermostat User Guide

Honeywell TH8321WF1001 Wi-Fi VisionPRO thermostat User Guide

This Honeywell TH8321WF1001 Wi-Fi VisionPRO Thermostat User Guide is for the owner with the touchscreen already on the wall and a router it has never met. Every step, screen message and menu list below is quoted from the guide itself, with its page number attached.

The cover calls it the “Wi-Fi VisionPRO” 8000 User Guide, footer id 33-00066EFS—01. The file runs 156 pages because it is trilingual; the English section is pages 1 to 52. If you came looking for how to connect Honeywell VisionPro thermostat to Wi-Fi, that procedure starts on guide page 5.

Download Honeywell TH8321WF1001 Wi-Fi VisionPRO Thermostat User Guide (PDF)

Table of Contents

What the Thermostat Is For

Page 1 opens with six capabilities. You can “Connect to the Internet to monitor and control your heating/cooling system”, “View and change your heating/cooling system settings”, “View and set temperature and schedules”, “Receive alerts via email and get automatic upgrades”, “View outdoor temperature and humidity”, and “Download the free Total Connect Comfort app”.

Remote control is the payoff: “Once connected to Wi-Fi and registered to Total Connect Comfort, you can control your thermostat from anywhere through your laptop, tablet, or smartphone with the Total Connect Comfort app.” Help is listed twice in the guide — “For assistance please visit http://yourhome.honeywell.com , or call toll-free: 1-855-733-5465”.

The Four Buttons

Pages 3 and 4 are quick-reference panels, one for residential and one for commercial use. The four keys are defined identically on both: “HOME. Touch to display Home screen.”, “FAN. Select fan mode.”, “SYSTEM. Select system mode (Heat/Cool).” and “MENU. Touch to display options.”

The rest of the panel labels the touchscreen: “Start here to set a program schedule”, and “Touch an arrow to change temperature setting and select a Temporary or Permanent Hold”.

The Alert Light is “On when alert message is active or system is set to EmHeat.”, and it “Flashes for battery-only power; on continuous if system powered.” Backlighting varies: “It stays lit for 7 seconds after you complete changes.”, yet “Depending on how your thermostat was installed, the screen light may always be on.”

TH8321WF1001 Wi-Fi Setup

Pages 5 to 7 walk through steps 1.1 to 1.8. Touch MENU, then “Select Wi-Fi Setup”, and “The thermostat will scan for available Wi-Fi networks.” The screen shows “Finding Networks Please Wait” “after which it displays a list of all Wi-Fi networks it can find.”

Pick your network: “Find the name of the network you want to use by pressing the arrow buttons to scroll up/down or left/right. Press the Wi-Fi network name, then press Select.” Then “When prompted, press the screen to edit the password (if necessary).” The arrow keys change characters and letter case; “Press Done when complete.”

“The screen will let you know when the connection is successful.” If it fails, “the screen will explain why not”, and the guide adds: “Press the” up arrow “for other tips about this failed connection.”

Two extras sit nearby. Hidden networks: “If the Wi-Fi network name is hidden, see “Connecting to a hidden Wi-Fi network” on page 44.” Signal strength: “You can check signal strength at any time after the thermostat is connected to the Wi-Fi network by pressing MENU then Wi-Fi Setup.”

Later changes are covered too. To move to a new router, MENU then Wi-Fi Setup leads to “Disconnect Wi-Fi Network”; the screen “will show “Wi-Fi Disconnected Successfully.” Touch Done.” Reconnecting repeats the network list, then “The thermostat displays “Connecting Please Wait” then a “Connection Successful” screen.”

Registering With Total Connect Comfort

Wi-Fi alone is not remote access: “If you want remote access to the thermostat, you must set up an account at mytotalconnectcomfort.com and add the thermostat to the account.”

The identifiers are the fiddly part. “You will need the thermostat MAC and CRC IDs to add the thermostat. They are on the screen under Menu, Wi-Fi Setup and on the Thermostat ID Card packed with the thermostat.”

On the site, “After adding your thermostat location, you must enter the thermostat’s unique identifiers”, listed as “MAC ID” and “MAC CRC”. The TH8321WF1001 MAC and CRC IDs “are not case sensitive”, and appear on the Register Online screen or the printed card.

New accounts must be activated: “Check your email for an activation message from My Total Connect Comfort.” If nothing arrives, “check your junk mailbox or use an alternate e-mail address.” Then “the Total Connect Comfort registration screen will display a SUCCESS message.”

One caution about the printed card. The sample card reproduced on page 10 reads “HONEYWELL MODEL: RTH8580WF”, so the artwork in this VisionPRO 8000 user guide PDF shows a sibling model, not the TH8321WF1001. The registration steps are the same; use the card and screen from your own unit.

Clock, Fan and System Mode

Setting the clock is four touches, and registration changes it: “When registered to Total Connect Comfort, the thermostat automatically sets the time and adjusts for Daylight Saving Time.”

Fan modes, from page 13, are defined as: “On: Fan is always on.”, “Auto: Fan runs only when the heating or cooling system is on.”, “Circ: Fan runs randomly about 35% of the time (residential use only).” and “Follow Schedule: Fan controlled by program”.

System modes, from page 14: “Heat: Controls only the heating system.”, “Cool: Controls only the cooling system.”, “Off: Heating/cooling systems are off.”, “Auto: Selects heating or cooling depending on the indoor temperature.” and “Em Heat (heat pumps with aux. heat): Controls auxiliary/emergency heat. Compressor is locked out.” Not everyone sees all five: “The Auto and Em Heat system settings may not appear, depending on how your thermostat was installed.”

Schedules and Holds

Page 15 prints the defaults: “This thermostat uses default Energy Saver settings that can reduce your heating/cooling expenses.” The residential rows are the ones most owners touch.

Preset energy-saving schedules, residential use (page 15)
PeriodStart timeHeatCool
Wake6:00 am70°78°
Leave8:00 am62°85°
Return6:00 pm70°78°
Sleep10:00 pm62°82°

The commercial table below carries a fan column, and about its starred rows the guide states: “Period 2 is cancelled by default. If you activate it, the values shown above are default settings.”

Preset schedules, commercial use (page 15)
PeriodStart timeHeatCoolFan
Occupied 18:00 am70°75°On
Unoccupied 110:00 pm55°85°Auto
Occupied 2*12:00 am70°75°On
Unoccupied 2*12:00 am55°85°Auto

To change any of it, “Select Edit Schedule to display Use Scheduling Assistant?” — “Touch Yes to create a schedule by answering simple questions.” or “Touch No to manually create a program schedule.”

Manual editing runs “Select the days to schedule”, then sets the Wake time and its Heat and Cool temperatures, then “Touch other time periods (Leave, Return, Sleep) to set time and temperatures for each.” “Touch Cancel Period to eliminate any unwanted time period.”, and “Touch Fan Setting to customize fan settings for any time period.”

Holds differ by use. Residential: “The schedule will resume when the Hold Until time expires.”, or “Select Permanent Hold to keep the same temperature until you change it or resume the program schedule.” Commercial: the adjusted temperature “will be maintained for 1 hour and can be adjusted up to the maximum time set by the installer.” Both share “Touch Cancel Hold at any time to resume the program schedule.”

Vacation hold, residential, “helps you save energy while you are away, and restores comfortable settings just before you return home.” Commercial sites get holiday scheduling instead: “Custom Events lets you set up other days for special schedules.”, and “US and Canadian Holiday options let you select from a list of holidays commonly observed in each country.”

Humidity lives under MENU. Dehumidification “can control a dehumidifier or use your air conditioner to reduce humidity”, with a trade-off the guide states plainly: “the temperature may drop up to 3° F below your temperature setting until humidity reaches the desired level.”

For winter, “If frost or condensation appears on the windows, touch MENU, then select Window Protection.”, where you “Use a lower number to prevent frost or condensation.” Two limits apply: “Window Protection is available only if an outdoor air sensor is installed.” and “the thermostat may maintain a 15% separation between humidification and dehumidification settings.”

Ventilation has three modes: “Auto: Ventilation runs as programmed by the installer.”, “Off: Ventilation remains off unless turned on using the timer.” and “On: Ventilation is always on.”, plus Temporary Boost and a Lockout that “prevent ventilation from running during the Sleep or Unoccupied (commercial) program periods or when outdoor conditions exceed values set by the installer.”

Preferences “let you select how the thermostat displays information or responds to certain situations”: filter reminders, Fahrenheit/Celsius, clock format, backlighting, alert light, scheduling, adaptive recovery, default schedule and daylight saving time.

Two housekeeping menus. “When you select the Clean Screen option, the screen is locked so you don’t accidentally change settings while you clean.” — and “Do NOT spray any liquid directly on the thermostat.” Security “can adjust security options to prevent unauthorized changes”: “Unlocked: Full access allowed.”, “Partially locked: Only temperature can be changed.”, “Fully locked: No access allowed.”

Advanced features, page 37, explain the odd behaviour owners report. Recovery: “The thermostat displays “In Recovery” when it turns the system on early.” Installer options “require a password and should only be changed by a qualified technician.”

TH8321WF1001 Troubleshooting

Wi-Fi failures get three named causes on pages 42 and 43, and the guide prints one screen each.

Connection Failed causes (pages 42-43)
ScreenWhat the guide says
Invalid Password“The password you entered is invalid. Check that you have the right password and try again.”
No IP Address“The thermostat was unable to obtain an IP address from the router. Verify the router is correctly set up to automatically assign IP addresses.” If it still fails, “remove the thermostat from the wallplate for 10 seconds, then snap it back into place.”
No Internet Link“The thermostat connected to the Wi-Fi network but was unable to establish a connection to the internet. Check the router settings and try again.”

Page 47 covers the rest under four headings. “Screen is blank”: “Check circuit breaker and reset if necessary.”, “Make sure power switch at heating and cooling system is on.”, “Make sure furnace door is closed securely.”

If the unit runs on cells, “make sure fresh AA alkaline batteries are installed correctly.”

“Screen is difficult to read”: “Change screen brightness using Preferences menu (see page 33).” “Red light is on”: “If thermostat is in Emergency Heat mode, the red light is normal.”, otherwise “an alert is active. Check message on the thermostat screen.”

“Heating or cooling system does not respond”: set SYSTEM to Heat and “Make sure the temperature is set higher than the Inside temperature”, or to Cool and “Make sure the temperature is set lower than the Inside temperature”. Then check breaker, power switch and furnace door.

If the screen says Wait: “If “Wait” is displayed, the compressor protection timer is on. Wait 5 minutes for the system to restart safely, without damaging the compressor.”

Warranty and Fine Print

Page 48 is headed “Up to 5-year limited warranty”, but its own sentence is narrower: “Honeywell warrants this product, excluding battery, to be free from defects in the workmanship or materials, under normal use and service, for a period of three (3) years from the date of purchase by the consumer.”

It also warns that “This warranty does not cover removal or reinstallation costs.” Customer Care is the same 1-855-733-5465 number, and the last English page adds “This thermostat contains a Lithium battery which may contain Perchlorate material.”

FAQ

Do I need Total Connect Comfort to use the thermostat?

No. Wi-Fi setup is local. The account is only for remote access, since you “must set up an account at mytotalconnectcomfort.com and add the thermostat to the account.”

Where do I find the MAC and CRC numbers?

Two places, per the guide: “They are on the screen under Menu, Wi-Fi Setup and on the Thermostat ID Card packed with the thermostat.” They are not case sensitive.

Why does my screen say Wait and nothing happens?

Compressor protection. “If “Wait” is displayed, the compressor protection timer is on. Wait 5 minutes for the system to restart safely, without damaging the compressor.”

Why is Circ missing from my fan menu?

The guide defines it as residential-only — “Circ: Fan runs randomly about 35% of the time (residential use only).” In commercial use, “touch Auto or On to temporarily override the programmed fan schedule.”

How long does a commercial hold last?

“The new temperature will be maintained for 1 hour and can be adjusted up to the maximum time set by the installer.”

Honeywell RM7895A1014 Installation Manual

Honeywell RM7895A1014 Installation Manual

This Honeywell RM7895A1014 Installation Manual guide follows the 28-page document honeywellmanual.com lists under that name: form 65-0205, marked “PRODUCT DATA”, “Copyright © 1996 Honeywell Inc.” and titled “7800 SERIES EC7895A, RM7895A RELAY MODULE”. Installation begins on page 9; troubleshooting starts on page 26.

One naming point first. The body text never prints RM7895A1014. It says RM7895A, while the only “1014” in the document belongs to the Q7700A1014 network interface unit. Treat the listing title as the catalog name and look for RM7895A on the label.

The manual calls the product “a microprocessor based integrated burner control for automatically fired gas, oil, or combination fuel single burner applications”, and assembles it from four parts: “The RM7895 consists of the Relay Module. Subbase, Amplifier and Purge Card.”

Download Honeywell RM7895A1014 Installation Manual (PDF)

Table of Contents

What the Manual Covers

The contents page runs General, Features, Specifications, Ordering Information, Principal Technical Features, Safety Provisions, Installation (page 9), Wiring (11), Assembly (14), Operation (17), Checkout (20) and Troubleshooting (26). The EC7895A shares every chapter; it is the 200 Vac version and carries its own terminal table, Table 1B.

The feature list opens with safety: airflow switch check, closed loop logic test, dynamic AMPLI-CHECK, dynamic input check, dynamic safety relay test, dynamic self-check logic, internal hardware status monitoring, and tamper resistant timing and logic. Five LEDs report the sequence: “POWER, PILOT, FLAME, MAIN and ALARM.” Nonvolatile memory retains “history files and sequencing status after loss of power.”

The optional Keyboard Display Module adds a “2 row by 20 column Vacuum Fluorescent Display (VFD)” for first-out annunciation. The system “distinguishes 43 modes of failure and detects and annunciates difficult-to-find intermittent failures.”

Electrical and Environmental Ratings

The RM7895A supply is “100 Vac (+10/-15%), 50 or 60 Hz (+/- 10%).” Power dissipation is “10W maximum”, the load ceiling is “2000 VA maximum connected load to 7895 Assembly.”, and fusing is “20A maximum, type FRN or equivalent”. The EC7895A takes 200 Vac; Table 1B covers its terminals.

The environmental block gives operating −40 °F to 140 °F and storage −60 °F to 150 °F, plus “85% RH continuous, noncondensing” and a “0.5G environment.” With its dust cover the module weighs “1 pound 15 ounces, unpacked.”

Approvals are split by model: “RM7895A: Underwriters Laboratories Inc. listed: File no. MP268, Guide no. MCCZ. Factory Mutual approved.” The EC7895A entry lists Factory Mutual only. Dimensions sit in Fig. 1 and Fig. 2 rather than in the text.

RM7895A Terminal Ratings

Table 1A is headed “RM7895A Terminal Ratings.” It runs from the two ground entries through terminal 22; terminals 12 to 21 print “Unused” on every row and are omitted here, with the warning repeated below.

Table 1A: RM7895A terminal ratings (page 2)
TerminalDescriptionRating
G“Flame Sensor Ground Earth”—
G“Earth Ground”—
2“L2(N)”, “Line Voltage Common”—
3Alarm“100 Vac, 1A pilot duty.”
4Burner Motor“100 Vac, 9.8 AFL, 58.8 ALR (inrush).”
5Line Voltage Supply (L1)“100 Vac (+10/-15%), 50 or 60 Hz (+/- 10%).”
6Burner Controller and Limits“100 Vac, 1 mA.”
7Airflow Interlock“100 Vac, 9A.”
8Pilot Valve/Ignition“100 Vac, 4.5A ignition and 50VA pilot duty.”
9Main Fuel Valve“100 Vac, 2A pilot duty.”
10Ignition“100 Vac, 4.5A ignition.”
F(11)Flame Sensor“60 to 220 Vac, current limited.”
22Shutter“100 Vac, 0.5A”

Terminals 12 to 21 are “Unused”, and the wiring figures warn “DO NOT CONNECT ANY WIRES TO UNUSED TERMINALS.”

What a Complete Installation Needs

Three items are required besides the RM7895A relay module: “Plug-in Flame Signal Amplifier, see Table 2. Plug-in Purge Timer Cards: Selectable ST7800A, two seconds to 30 minutes. Q7800A or Q7800B.”

Table 2 sorts amplifiers by detection method and colour: rectification (green) R7847A, AMPLI-CHECK R7847B and self-check R7847C; infrared (red) R7848A and R7848B; ultraviolet (purple) R7849A and R7849B, plus the self-checking R7861A and R7886A. “Make sure the correct combination of amplifier and flame detector(s) is used.”

One footnote matters on continuously firing equipment: “The C7012A,C, C7027, C7035 and C7044 Flame Detectors should be used only on burners that cycle on-off at least once every twenty-four hours.” The subbase choice is “Q7800A for panel mount or Q7800B for wall or burner mount”, and “PURGE is determined by the ST7800A Purge Card selected.”

Mounting the Q7800A Subbase

Mount the subbase in any position except horizontally with the bifurcated contacts pointing down. The standard vertical position is recommended; any other position decreases the maximum ambient temperature rating.

Choose a wall, burner or panel location; the Q7800 can sit in the control cabinet. Leave service clearance for the module, cover, amplifier and probes, then use the back of the subbase as a template for four no. 6 screws.

Mount the module vertically, or horizontally with the knife blade terminals pointing downward. On a Q7800A it must be inside an electrical enclosure. Tuck wiring against the back of the subbase, align the four L-shaped corner guides, and use “a plug-in motion rather than a hinge action.”

Site limits are strict: “The EC7895 or RM7895 is not designed to be weather tight.” Outdoors it needs an approved weather-tight enclosure. Condensing moisture can cause a safety shutdown, and vibration must not exceed 0.5G continuous.

Wiring Rules and Limits

Start with the disconnect: “Disconnect the power supply before beginning installation to prevent electrical shock and equipment damage.” More than one power disconnect may be involved. Use “no. 14, 16, or 18 copper conductor (TTW60C or THW75C or THHN90C) 600 volt insulation wire for all Line Voltage terminals.”

Grounding gets its own paragraph: the earth wire must be able to blow the 20A fuse in an internal short, the path must be low impedance, and wide straps or brackets are preferred over leadwires.

For flame detector wiring, “Do not run high voltage ignition transformer wires in the same conduit with the flame detection wiring.” Keep sensor leads short, because “The maximum permissible leadwire length depends on the type of flame detector, leadwire and conduit.” Control and airflow interlock leads top out at 300 feet.

One discrepancy deserves a meter. Fig. 7 labels the supply “120V, 50/60 Hz POWER SUPPLY.” while page 2 rates the module at “100 Vac (+10/-15%)”, which tops out at 110 Vac. Check the panel against Table 1A first.

Complete the static checkout with the module off the subbase: “After checking all wiring, perform this checkout before installing the EC7895 or RM7895 on the subbase.”

Purge Card, Cover and Amplifier

The ST7800A purge card goes in after the dust cover or display module comes off. Pull upward on the plastic support cover to release the old card, confirm the replacement has the desired timing, insert it into the opening, refit the cover, restore power, and run at least one complete cycle.

For the amplifier, disconnect power, align the circuit board edge connector with the keyed receptacle, “Ensure the amplifier nameplate faces away from the Relay Module”, push until fully inserted, then seat it toward the retaining clasp. The dust cover aligns by its two interlocking ears and slots. “Perform all required checkout tests.”

Flame detector installation defers to the detector instructions, with one rule repeated here: “Keep the flame signal leadwires as short as possible from the flame detector to the wiring subbase.”

Sequence, Jumpers and the LEDs

Power-up starts a ten-second INITIATE period. If line voltage or frequency falls outside +10/−15% or ±10%, the module holds, and “If the condition is not corrected and the hold condition exists for four minutes, the RM7895 locks out.”

STANDBY waits for a call for heat and the correct state on the burner switch, limits and monitored circuits. PREPURGE is selectable from two seconds to 30 minutes, with the blower motor output on terminal 4. The airflow interlock must close ten seconds into PREPURGE or within the purge card timing.

During the pilot trial, terminals 8 and 10 energize. Flame must prove within the 4 or 10 second PFEP; then ignition drops out and terminal 9 powers the main fuel valve. A flameout brings lockout or recycle “within .8 or 3 seconds, depending on the Flame Failure Response Time (FFRT) of the amplifier.”

Sequence timing for normal operation (page 5)
DeviceInitiateStandbyPurgePilotMain
EC7895A/RM7895A10 sec.***4 or 10 sec.No

* STANDBY and RUN can be infinite. ** PURGE is set by the ST7800A card. The main column prints “No”.

Three site-configurable jumpers set the behaviour; clip them with side cutters and remove the resistors, which the manual says enhances safety.

Table 3: site-configurable jumper options (page 19)
JumperFunctionIntactClipped
JR1Pilot Flame Establishing Period10 seconds4 seconds
JR2Flame Failure ActionRecycleLockout
JR3Airflow Switch (ILK) FailureRecycleLockout

The green POWER LED blinks every four seconds while the hardware runs correctly; PILOT, FLAME, MAIN and ALARM report the rest.

Checkout and Flame Signal

Table 4 holds seven static tests. They jumper the subbase and read voltage to L2: 5-L2 for line voltage, 6-L2 for limits, 4-5 to start the burner motor and see 7-L2 within ten seconds, 5-10 for ignition, 5-8 for pilot, 5-9 for the main valve, and 5-3 for the alarm. Close all manual fuel shutoff valves first.

Do not megger the installed control: “Do not perform a dielectric test with the EC7895 or RM7895 installed.”

The flame signal floor is 1.25 Vdc, with 5.0 Vdc expected at the Keyboard Display Module or at a 1M ohm/volt meter. “Measure the flame signal at the appropriate times defined in the following checkout tests.” Read at the + and − (Com) jacks on the 0 to 10 Vdc range.

Five safety shutdown tests close the section: an airflow interlock closed during PREPURGE, PILOT IGN, MAIN IGN or RUN; a simulated flame 40 seconds after STANDBY entry or 30 seconds into PREPURGE; failed pilot ignition; failed main ignition; and loss of flame during RUN. “Safety shutdown occurs.” each time.

On replacement: “If an EC7895 or RM7895 is replaced with a lower or higher functioning 7800 SERIES Relay Module, the burner will not sequence unless wiring changes are made.”

RM7895A Troubleshooting

RM7895A troubleshooting starts at the ALARM LED and, if fitted, the Keyboard Display Module. “First-out Annunciation reports the cause of a safety shutdown or identifies the cause of a failure to start or continue the burner control sequence with text and numbered code via the optional Keyboard Display Module.” Self-diagnostics separate field faults from internal ones.

Nonvolatile memory keeps “Historical Information for the six most recent lockouts”, with the cycle, hour, fault message and burner status at the time of each fault. Status messages are STANDBY, PRE-PURGE, PILOT IGN, MAIN IGN and RUN.

Display holds are STANDBY HOLD F/G (flame detected), STANDBY HOLD T7 (closed airflow interlock), PURGE HOLD F/G and PURGE HOLD T7. A flame that does not clear within 40 seconds in STANDBY locks the RM7895 out; either purge hold locks out after 30 seconds.

Reset with the pushbutton, or remotely through a Keyboard Display Module, DATA CONTROLBUS MODULE, Extension Cable Assembly or Remote Reset Module. “A power-up reset causes an electrical reset of the EC7895 or RM7895 but does not reset a lockout condition.” For deeper diagnostics the manual points to “the 7800 SERIES System Annunciation Diagnostics and Troubleshooting, form 65-0118.”

FAQ

Does the manual print the model number RM7895A1014?

No. The body prints RM7895A; the only “1014” is inside the Q7700A1014 part number on page 5. The listing title carries the longer number.

What supply voltage does the RM7895A require?

“100 Vac (+10/-15%), 50 or 60 Hz (+/- 10%).” Fig. 7 labels its supply “120V, 50/60 Hz POWER SUPPLY.” which sits outside that band, so verify the panel voltage before wiring.

Which subbase and purge card fit the RM7895A?

“Q7800A for panel mount or Q7800B for wall or burner mount.” The purge card is a “Selectable ST7800A, two seconds to 30 minutes”, and its timing sets the PREPURGE period.

How long are INITIATE, PREPURGE and the pilot trial?

INITIATE lasts ten seconds if the supply stays within tolerance. PREPURGE runs from two seconds to 30 minutes, set by the ST7800A card. The pilot flame establishing period is 10 seconds with JR1 intact and 4 seconds with JR1 clipped.

What flame signal is acceptable?

At least 1.25 Vdc, and 5.0 Vdc expected at the Keyboard Display Module or a 1M ohm/volt meter. Measure at the amplifier’s + and − (Com) jacks on the 0 to 10 Vdc range.

How do I clear a lockout?

Press the reset pushbutton, or use a remote reset if one is wired. A power-up reset does not clear a lockout. The module retains the six most recent lockouts, with cycle, hour, fault message and burner status.

Honeywell Aquastat L4006A Installation Instructions

These boiler-mounted, immersion type controllers operate in response to temperature changes in hydronic heating systems. The L4006 family covers high limit, low limit and circulator duty on hydronic boilers, in immersion well and surface mount versions. This page reproduces form 60-0915—06 in full, including the heat-conductive compound material safety data sheet that ships with the immersion well models.

Internal view of the L4006A,B Aquastat controller with the case open, showing the setpoint indicating dial, differential adjustment wheel, adapter clamp screws and horizontal immersion well
Fig. 1. Internal view of L4006A,B with horizontal well. L4006E is the same with reset button added.

Application

Model Switch action How it is used
L4006A Breaks the circuit on a temperature rise to the control setting. High limit or low limit control. When used as a controller or as a low limit, a separate high limit must be used.
L4006B Makes the circuit on a temperature rise. Circulator controller, delaying circulator operation when boiler water temperature is below the control setting.
L4006E Breaks the control circuit when the controlled medium reaches the high limit setting; trip-free manual reset. A reset button on the front of the case must be pressed to re-establish the control circuit.
L4006H Breaks the control circuit at the high limit setting; trip-free manual reset, as on the L4006E. Includes bracket and clamp for surface mounting on pipe or tank.

A plastic bag of heat-conductive compound is included with the L4006A,B,E Aquastat® Controllers for use when the sensing bulb is inserted into a well designed for a large bulb than the one used on the L4006A,B,E. A 124904 Well Adapter, for use on old wells that do not fit the L4006A,B,E immersion well clamp, can be ordered; see form 68-0040, Wells and Fittings for Temperature Controllers. A setting stop is included to prevent setting above a desired temperature on limit.

If a well adapter or other accessories are needed, refer to form 68-0040, Wells and Fittings for Temperature Controllers, for part numbers and ordering information.

Installation

WARNING — Electrical shock hazard. Can cause serious injury, death or equipment damage. Disconnect the power supply before beginning installation to prevent electrical shock or equipment damage.

When installing this product…

  1. Read these instructions carefully. Failure to follow them could damage the product or cause a hazardous condition.
  2. Check the ratings given in the instructions and on the product to make sure the product is suitable for your application.
  3. Installer must be a trained, experienced service technician.
  4. After installation is complete, check out product operation as provided in these instructions.

Installing immersion well models (L4006A,B,E)

Important: Obtain the best thermal response with a well that snugly fits the sensing bulb. The bulb should be inserted until it rests against the bottom of the well. Use a well of correct length and bend the tubing, if necessary, to provide enough force to hold the bulb against the bottom of the well. Do not make a sharp bend in the tubing. A sharp bend can produce a break in the tubing and cause a loss of fill. This condition will cause the high and low limit controls to be made continuously.

If the well is not a snug fit on the bulb, use the heat-conductive compound as follows. Fold the plastic bag of compound lengthwise and twist gently. Snip the end of the bag and insert into the well. Slowly pull out the bag while squeezing firmly to distribute the compound evenly in the well. Insert the bulb into the well. Bend the tubing, if necessary, to provide force to hold the bulb against the bottom of the well and to hold the out end of the bulb in firm contact with the side of the well. Wipe off any excess compound.

Note: Some models have an adjustable capillary tubing length to 3 inches (76 mm). In these models, pull out extra tubing from inside the case, if needed.

Follow the boiler manufacturer instructions, if available; otherwise, proceed as follows.

  1. Remove the old control.
  2. Refer to the cover insert of the old control to identify and tag each lead as it is disconnected.
  3. Leave the old well in place if it is suitable.

If the well is otherwise suitable but does not fit the L4006 immersion well clamp

Use a 124904 Well Adapter (order separately, see form 68-0040) to secure the L4006 to the old well. The adapter has a flange at one end for fastening the L4066 adapter clamp.

  1. Loosen, but do not remove, the two adapter clamp screws (see Fig. 1).
  2. Slide the adapter onto the capillary and short tube; see Fig. 2 inset.
  3. Make sure the flanged end of the adapter fits into the hole in the case. Position the adapter well clamp snugly over the flange on the adapter, then tighten the clamp screws.
  4. Insert the bulb into the well, as shown in Fig. 2. If necessary, use the heat-conductive compound as instructed in the IMPORTANT statement above.
  5. Tighten the setscrew (if one is present in the old well spud) against the adapter.

If the old well is unsuitable

  1. Drain the system and remove the well.
  2. Select a new well from form 68-0040 (order well separately).
  3. Install the new well, refill the system and check for leaks.
  4. Loosen, but do not remove, the two adapter clamp screws (Fig. 1).
  5. Insert the sensing bulb into the well until it bottoms as show in Fig. 2. Add heat-conductive compound, if necessary, as instructed in the IMPORTANT statement above.
  6. Make sure the end of the well fits into the hole in the case. Position the immersion well clamp snugly over the well flange and tighten the clamp screw securely.
Sectional drawing of the sensing bulb inside an immersion well, showing the well adapter, adapter clamp, capillary tube, setscrew and heat-conductive compound, with an inset of the back of the case
Fig. 2. Bulb in immersion well and use of adapter.
Diagram notes (text version)
  • Slightly bend in tubes should hold bulb in good thermal contact with the well at two opposite points, as in (A) and (B).
  • Assure that tubes fit freely in adapter so that tension of the capillary tube at point (C) holds the sensing bulb in good thermal contact with the bottom of well at point (D).

Surface mounting the L4006H

The L4006H is designed for surface mounting on piping or tank and can be mounted in any position.

When mounting the L4006H on piping, the pipe should be 1 in. (25 mm) diameter or larger for accurate temperature sensing.

  1. Remove any insulation from the pipe.
  2. Thoroughly scrape off all scale, rust or paint.
  3. Mount controller as shown in Fig. 3 using adjustable 12 in. (294 mm) pipe strap furnished.

When mounting the L4006H on a tank, use a pipe strap of appropriate length, approximately 6-10 ft (17.6- 29.4m) for the tank (not provided). Fit the pipe strap through the slot in the mounting bracket. See Fig. 3.

L4006H controller case fastened to a vertical pipe with the 12 inch adjustable pipe strap and mounting bracket
Fig. 3. Mount L4006H directly on surface.

Wiring

WARNING — Electrical shock hazard. Can cause serious injury, death or equipment damage. Disconnect power supply before connecting wiring to avoid electrical shock or equipment damage.

All wiring must comply with local codes and ordinances regarding wire size, insulation, enclosure, etc. See Fig. 4 and 5 for typical diagrams of Aquastat® Controllers used in heating systems.

Use these Aquastat Controllers with copper wire only.

Typical hookup diagram for a gas-fired system with domestic hot water: 24 volt thermostat, low water cutoff, pressure control, L4006A or L4007A low limit Aquastat controller, gas valve and Pilotstat control
Fig. 4. Typical hookup for gas-fired system with domestic hot water.
Diagram notes (text version)
  • Power supply. Provide disconnect means and overload projection as required.
  • Use L4006E for manual reset.
Hookup diagram for an oil-fired summer-winter hydronic system with domestic hot water: RA832A switching relay, high limit and low limit Aquastat controllers, circulator Aquastat controller, ignition, circulator, burner and Protectorelay control
Fig. 5. Hookup for oil-fired, summer-winter, hydronic system with domestic hot water. This is typical where control for domestic hot water is added, or where each Aquastat Controller is mounted in a separate location.
Diagram notes (text version)
  • Power supply. Provide disconnect means and overload protection as required.
  • Use L4006E for manual reset.

Operation

For proper selections of settings, follow boiler manufacturer recommendations:

  1. High limit controller: Shuts off burner when water temperature exceeds high limit setting. Burner restarts when temperature drops to high limit setting minus the temperature differential.

Note: If L4006E or H, see Manual Reset section.

  1. Low limit controller: Maintains minimum boiler temperature for domestic hot water. Turns boiler on at temperature setting, less differential.
  2. Circulator controller: Prevents circulation of water that is not hot enough. Breaks circulator circuit at temperature setting minus differential and remakes at setting.

Adjustment

Set the differential to correspond with the boiler manufacturer recommendations. To adjust models with adjustable differential, rotate the wheel on the back of the snap switch until the desired reading is aligned with the V notch in the frame. The wheel provides an adjustment from 5°F to 30°F (3°C to 17°C). Replace the cover on the Aquastat Controller.

Adjust the control point to correspond with the boiler manufacturer recommendations. To adjust, insert a screwdriver in the slotted screw type head located beneath the window in the cover. Turn the scale to the desired control point.

Manual reset

When the device includes manual reset (L4006E and H), be sure to press the red reset button on the front of the case to make sure that the controller is not locked out on safety. When checking out the system, adjust the control point low enough so the temperature of the controlled medium reaches the high limit setting, the burner shuts off, and the Aquastat Controller locks out. When the temperature of the controlled medium drops to the high limit setting minus differential, push the manual reset button and the system should be operative again. Reset control to proper high limit setting.

Checkout

Check to make certain that the Aquastat Controller has been installed and adjusted properly. Put the system into operation and observe the action of the device through several cycles to make certain that it provides proper control of the system as described in the Operations section. Further adjustments can be made to meet more exact comfort requirements.

Heat-conductive compound: material safety data sheet (DS9021)

Section 1. Product and company identification

  • Product name: Heat Conductive Compound
  • MSDS ID: DS9021
  • Synonyms: MS1699
  • Product use: Heat conductive material used to enhance contact and heat transfer in temperature sensor applications.
  • Manufacturer: Resideo Technologies Inc., 1985 Douglas Drive North, Minneapolis, MN 55422.
  • Date released: October 8, 1999
  • Customer Response Center: 800-328-5111
  • Emergency telephone information: 888-809-3787
  • NFPA ratings: Health 0; Flammability 1; Reactivity 0; Personal Protection B

Section 2. Composition, information on ingredients

Ingredient CAS number Percent PEL TVL
#2 Lithium Complex Grease (70%):
Mineral Oil 64742-65-0 35-50 5 mg/m3 5 mg/m3
Mineral Oil 64742-62-7 20-25 5 mg/m3 5 mg/m3
Lithium Hydrostearate/Sebacate Complex 68815-49-6 4-9 — —
Zinc Alkyldithiophosphate 68649-42-3 0-2 — —
Aluminum Paste (30%):
Aluminum, as Al 7429-90-5 20-25 15 mg/m3 10 mg/m3
Aliphatic Petroleum Distillates 8052-41-3 10-15 2900 mg/m3 525 mg/m3
Stearic Acid 57-11-4 1-2 — —
Aromatic Petroleum Distillates 64742-95-6 1-2 5 mg/m3 5 mg/m3

Additional information: Part No. 120650 (0.5 oz tube); Part No. 107408 (4 oz can); Part No. 197007 (5 gallon container). May also contain minute amounts of lithium and molybdenum lubricant compounds.

Section 3. Hazard identification

Acute health effects

  • Skin: Excessive contact may cause skin irritation and dermatitis.
  • Eye: Direct contact with eye will cause irritation.
  • Inhalation: No adverse effects are expected.
  • Ingestion: Ingestion of product may cause nausea, vomiting and diarrhea.

Chronic health effects

  • Existing skin rash or dermatitis may be aggravated by repeated contact.
  • OSHA hazard classifications: None.
  • Carcinogenicity: Not considered to be a carcinogen by either OSHA, NTP, IARC, or ACGIH.

Section 4. First aid measures

  • Eye contact: Flush eyes with water for 15 minutes. Remove any contact lenses and continue to flush. Obtain medical attention if irritation develops and persists.
  • Skin contact: Remove excess with cloth or paper. Wash thoroughly with mild soap and water. Obtain medical attention if irritation develops and persists.
  • Ingestion: Contact physician or local poison control center immediately.
  • Inhalation: Remove patient to fresh air and obtain medical attention if symptoms develop.

Section 5. Fire fighting measures

  • Material flash point: > 383°F (195°C). Will burn if exposed to flame.
  • Extinguishing media: Carbon dioxide, dry chemical or foam.
  • Special fire fighting procedures: None.
  • Explosion hazards: None. Aluminum powder can react with water to release flammable hydrogen gas. In the form of this product, this reaction is not expected.

Section 6. Accidental release measures

Scrape up and dispose of as solid waste in accordance with state and federal regulations.

Section 7. Handling and storage

Store in dry place. Keep container closed when not in use.

Section 8. Exposure controls and personal protection

  • Ventilation: No special ventilation is required when working with this product.
  • Respiratory protection: None required.
  • Eye protection: Not normally required. However, use chemical safety goggles or faceshield if potential for eye contact exists, especially if material is heated.
  • Hand/clothing protection: Not normally required. Protective gloves and clothing are recommended, as material is difficult to remove from skin and clothing.
  • Other protective equipment: None required.

Section 9. Physical and chemical properties

  • Appearance/odor: Aluminum color, semi-solid material, pleasant odor.
  • Solubility in water: Negligible.
  • Specific gravity: 0.86.

Section 10. Stability and reactivity

  • Stability: Stable.
  • Reactivity: Hazardous polymerization will not occur.
  • Incompatibilities: Strong oxidizing agents and halogens.
  • Hazardous decomposition products: Carbon dioxide, carbon monoxide.

Section 11. Toxicology information

No data available.

Section 12. Ecological information

Chemical fate information: Hydrocarbon components will biodegrade in soil; relatively persistent in water.

Section 13. Disposal consideration

Dispose of as solid waste in accordance with local, state and federal regulations.

Section 14. Transportation information

DOT classification: Not classified as hazardous.

Section 15. Regulatory information

SARA Title III supplier notification: Include in Section 311/312 inventory reports if amounts exceed 10,000 pounds. Aluminum compounds are subject to the reporting requirements under Section 313 of Emergency Planning and Community Right-To-Know Act of 1986 (40 CFR 372). Ingredients listed in TSCA Inventory.

Section 16. Other information

This information is furnished without warranty, expressed or implied, except that is is accurate to the best of our knowledge.

Document information

Resideo Technologies, Inc., 1985 Douglas Drive North, Golden Valley, MN 55422. Customer care: 1-800-468-1502. www.resideo.com. © 2020 Resideo Technologies, Inc. All rights reserved. This product is manufactured by Resideo Technologies, Inc. and its affiliates.

60-0915—06   M.S. Rev. 05-20  |  Printed in United States

Download:Honeywell L4006,7,8; L6006,7,8 AquastatÆ Controllers Manual.pdf