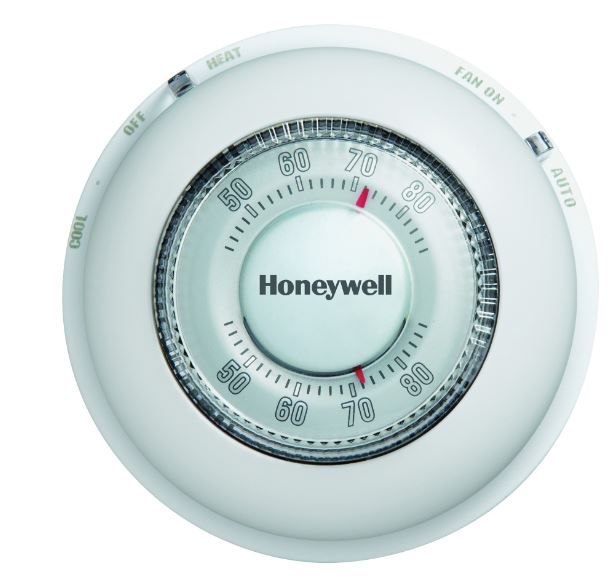
The Honeywell CT87K Owner’s Manual is the official installation-and-operation booklet for Honeywell’s classic “The Round” non-programmable, dial-operated room thermostat. The document number is 69-1959EFS-02, a 16-page trilingual guide (English on pages 1-5, French on 6-10, Spanish on 11-15). It covers two physically similar models together: the CT87K for 24 VAC heating systems, and the CT87N for 24 VAC heating and cooling systems. If your wall dial only has an R and a W connection and no system or fan switch, the CT87K sections are the ones you need.
The CT87K is a mechanical setpoint dial, not a digital programmable thermostat. You set the temperature by rotating the round face; there is no schedule, no app, and no keypad. That simplicity is exactly why it is still installed in a lot of homes and small commercial spaces, and why the manual itself is short. The whole booklet fits on five English pages: package contents, removal of the old unit, wallplate mounting, wiring by terminal, two small configuration switches, and a one-line operating instruction.
Before wiring anything, verify you have the right model. The manual warns that if your old thermostat has four or more wires (not counting C or C1), you may have bought the wrong replacement for a CT87K. In that situation it tells you to stop and call Honeywell at 1-800-468-1502 for advice.
Key Features of the CT87K
The CT87K’s feature set is deliberately small. Honeywell’s Owner’s Manual and the corresponding retail listing describe a non-programmable, single-stage heat-only dial thermostat with a 24 VAC control circuit, 1-year limited warranty, Premier White housing, 3.69 in x 3.69 in x 1.09 in (94 x 94 x 28 mm) dimensions, and an optional decorative cover plate for hiding old marks. The owner-facing details that matter day to day are:
- Rotary setpoint dial. Turn the round cover to the temperature you want; the ring shows current and desired indoor temperature.
- Heat-only operation. The CT87K controls a single heating stage. It has no System switch and no Fan switch; those live on the CT87N sibling.
- Two configuration switches inside the base. The pair of cycle-rate switches is set once during installation to match your heating equipment (see the table below).
- Terminal block for R, W, and Y. The CT87K uses Y as the third conductor on a 3-wire hot-water heat-only valve circuit, not for cooling.
- Optional decorative cover plate. Fits behind the base to hide marks left by the previous thermostat.
- 24 VAC control power only. The Owner’s Manual lists the CT87K as being for 24 VAC heating systems. Do not install it on a line-voltage electric baseboard circuit.
The CT87N, which shares the manual, is the version to buy when you need heat, cool, and a fan switch as well as the dial.
Document Structure
The English portion of 69-1959EFS-02 runs in a fixed order. Knowing the layout is quicker than scrolling through a preview.
- Getting started (page 1). Package contents (thermostat, cover plate, wall anchors and screws, wire labels) and required tools: No. 2 Phillips and small pocket screwdrivers, hammer, level, pencil, and a drill bit sized 3/16 in for drywall or 7/32 in for plaster.
- Remove your old thermostat (page 1). Turn off power, remove the cover, leave the old wallplate in place, and check for a sealed mercury tube.
- Label wires and remove the old wallplate (page 2). Wrap each wire with the letter label that matches the old terminal, then remove the old wallplate. Includes the “wrong replacement” wire-count check and a table mapping common old-terminal letters to CT87N and CT87K terminals.
- Mount the base and connect wires (pages 2-3). Mark screw holes, drill and insert anchors, thread the wires, and tighten the terminal screws. Includes the notes about removing the R-Rc jumper, choosing O versus B on a heat pump, and taping off unused conductors.
- Configure the switches (page 4, CT87N sections apply when present). The fan-operation switch has an E and F position; the cycle-rate switches 1 and 2 have a four-row setting table for steam, high-efficiency, gas/oil, and electric systems.
- Finish installation (page 4). Snap the thermostat onto the base, restore power.
- Operation (page 5). The CT87N has a System switch (Cool, Heat, Off) and a Fan switch (On, Auto). Both models set temperature by rotating the dial.
- Warranty. The Owner’s Manual closes with the one-year limited warranty statement.
Wiring and Configuration
The CT87K terminal block carries R, W, and Y. The manual maps the older Honeywell or generic terminal letters to those three. Existing labels connect as follows:
- R, Rh, 4, or V → new R terminal.
- W, W1, or H → new W terminal.
- Y or Y1 or M → new Y terminal.
- C, X, or B → not used on the CT87K. Wrap the bare end with electrical tape and leave it disconnected.
The manual gives two wiring recipes for the heat-only model. A two-wire heat-only system uses only R and W. A three-wire hot-water heat-only system uses R to R, W to W, and Y to Y, which drives an open/close zone valve. Do not rely on wire color; label by the terminal letter on the old unit.
Cycle rate switches
Inside the base are two small switches, labeled 1 and 2, that set how often the thermostat cycles the equipment. The Owner’s Manual gives one row per heating type:
| Heating system | Switch 1 | Switch 2 |
|---|---|---|
| Steam or gravity | On | On |
| High-efficiency warm air (90% plus), hot water, or heat pump | Off | On |
| Gas or oil warm air (factory setting) | Off | Off |
| Electric warm air | On | Off |
Set both switches before you snap the cover on, because they are not reachable from the front. If you are replacing an identical CT87K, note the old switch positions in a photo before you remove the wires.
Setting the Temperature
Operation is a single action: rotate the round face to the number that matches the temperature you want the room to hold. The ring shows both the current indoor reading and the setpoint. There is no program, no hold, and no schedule to cancel; the CT87K keeps calling for heat until the room reaches where you turned the dial. If you need a heat/cool/off selection or a fan On/Auto switch, that is the CT87N’s System and Fan switch page in the same manual, not the CT87K.
Important Safety Notices
The CT87K Owner’s Manual carries four safety statements that are worth reading before the screwdriver comes out:
- Turn the power off first. Step 1 of the removal procedure reads: “CAUTION: TURN OFF POWER to system at the furnace, or at the fuse/circuit breaker panel before you begin.” Do not remove or touch low-voltage wiring until you have confirmed power is off at the equipment.
- Mercury disposal. The manual’s MERCURY NOTICE says that if your old thermostat contains mercury, you should contact your local waste-management authority for proper disposal instructions rather than placing it in the trash.
- Lithium / perchlorate cell. The Owner’s Manual states the thermostat contains a lithium battery that may contain perchlorate material and that special handling may apply; it points to the California DTSC perchlorate guidance.
- Cooling low-temperature caution. The CT87N version of the manual adds: “CAUTION: EQUIPMENT DAMAGE HAZARD (CT87N). Do not operate cooling system when outdoor temperature is below 50°F (10°C).” The CT87K is heat only and does not have that feature, but the same rule applies to any connected cooling equipment.
If you are not comfortable removing the old thermostat, if the wire labels do not line up with the CT87K terminals, or if your existing wiring uses more conductors than the CT87K expects, stop. Call Honeywell at the number in the manual or hire a licensed HVAC technician rather than guessing at a low-voltage connection.
Getting Help
The Owner’s Manual itself directs users to 1-800-468-1502 when the wire count does not match the CT87K’s expected two- or three-conductor heat-only circuit. Honeywell Home (a Resideo brand) also publishes the 69-1959EFS document and a companion Range Stops PDF on its support site under “The Round Non-Programmable Thermostat” listing. If you need the exact English wording for a warranty claim, note the model number (CT87K1004 or your variant), the date of purchase, and the terminal layout you used.
Download PDF: Honeywell The Round CT87K Owner’s Manual.pdf