These boiler-mounted, immersion type controllers operate in response to temperature changes in hydronic heating systems. The L4006 family covers high limit, low limit and circulator duty on hydronic boilers, in immersion well and surface mount versions. This page reproduces form 60-0915—06 in full, including the heat-conductive compound material safety data sheet that ships with the immersion well models.
Application
| Model | Switch action | How it is used |
|---|---|---|
| L4006A | Breaks the circuit on a temperature rise to the control setting. | High limit or low limit control. When used as a controller or as a low limit, a separate high limit must be used. |
| L4006B | Makes the circuit on a temperature rise. | Circulator controller, delaying circulator operation when boiler water temperature is below the control setting. |
| L4006E | Breaks the control circuit when the controlled medium reaches the high limit setting; trip-free manual reset. | A reset button on the front of the case must be pressed to re-establish the control circuit. |
| L4006H | Breaks the control circuit at the high limit setting; trip-free manual reset, as on the L4006E. | Includes bracket and clamp for surface mounting on pipe or tank. |
A plastic bag of heat-conductive compound is included with the L4006A,B,E Aquastat® Controllers for use when the sensing bulb is inserted into a well designed for a large bulb than the one used on the L4006A,B,E. A 124904 Well Adapter, for use on old wells that do not fit the L4006A,B,E immersion well clamp, can be ordered; see form 68-0040, Wells and Fittings for Temperature Controllers. A setting stop is included to prevent setting above a desired temperature on limit.
If a well adapter or other accessories are needed, refer to form 68-0040, Wells and Fittings for Temperature Controllers, for part numbers and ordering information.
Installation
WARNING — Electrical shock hazard. Can cause serious injury, death or equipment damage. Disconnect the power supply before beginning installation to prevent electrical shock or equipment damage.
When installing this product…
- Read these instructions carefully. Failure to follow them could damage the product or cause a hazardous condition.
- Check the ratings given in the instructions and on the product to make sure the product is suitable for your application.
- Installer must be a trained, experienced service technician.
- After installation is complete, check out product operation as provided in these instructions.
Installing immersion well models (L4006A,B,E)
Important: Obtain the best thermal response with a well that snugly fits the sensing bulb. The bulb should be inserted until it rests against the bottom of the well. Use a well of correct length and bend the tubing, if necessary, to provide enough force to hold the bulb against the bottom of the well. Do not make a sharp bend in the tubing. A sharp bend can produce a break in the tubing and cause a loss of fill. This condition will cause the high and low limit controls to be made continuously.
If the well is not a snug fit on the bulb, use the heat-conductive compound as follows. Fold the plastic bag of compound lengthwise and twist gently. Snip the end of the bag and insert into the well. Slowly pull out the bag while squeezing firmly to distribute the compound evenly in the well. Insert the bulb into the well. Bend the tubing, if necessary, to provide force to hold the bulb against the bottom of the well and to hold the out end of the bulb in firm contact with the side of the well. Wipe off any excess compound.
Note: Some models have an adjustable capillary tubing length to 3 inches (76 mm). In these models, pull out extra tubing from inside the case, if needed.
Follow the boiler manufacturer instructions, if available; otherwise, proceed as follows.
- Remove the old control.
- Refer to the cover insert of the old control to identify and tag each lead as it is disconnected.
- Leave the old well in place if it is suitable.
If the well is otherwise suitable but does not fit the L4006 immersion well clamp
Use a 124904 Well Adapter (order separately, see form 68-0040) to secure the L4006 to the old well. The adapter has a flange at one end for fastening the L4066 adapter clamp.
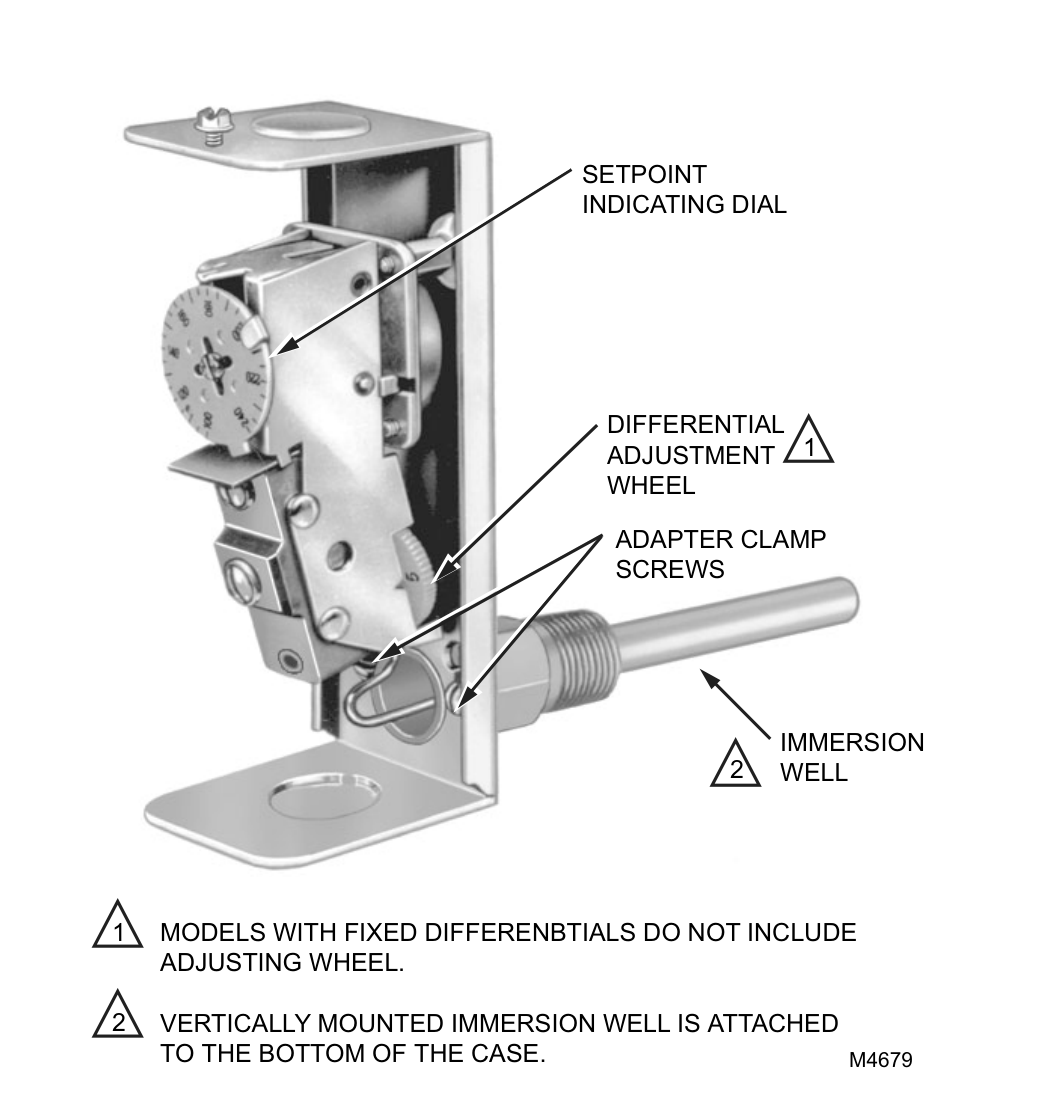
- Loosen, but do not remove, the two adapter clamp screws (see Fig. 1).
- Slide the adapter onto the capillary and short tube; see Fig. 2 inset.
- Make sure the flanged end of the adapter fits into the hole in the case. Position the adapter well clamp snugly over the flange on the adapter, then tighten the clamp screws.
- Insert the bulb into the well, as shown in Fig. 2. If necessary, use the heat-conductive compound as instructed in the IMPORTANT statement above.
- Tighten the setscrew (if one is present in the old well spud) against the adapter.
If the old well is unsuitable
- Drain the system and remove the well.
- Select a new well from form 68-0040 (order well separately).
- Install the new well, refill the system and check for leaks.
- Loosen, but do not remove, the two adapter clamp screws (Fig. 1).
- Insert the sensing bulb into the well until it bottoms as show in Fig. 2. Add heat-conductive compound, if necessary, as instructed in the IMPORTANT statement above.
- Make sure the end of the well fits into the hole in the case. Position the immersion well clamp snugly over the well flange and tighten the clamp screw securely.
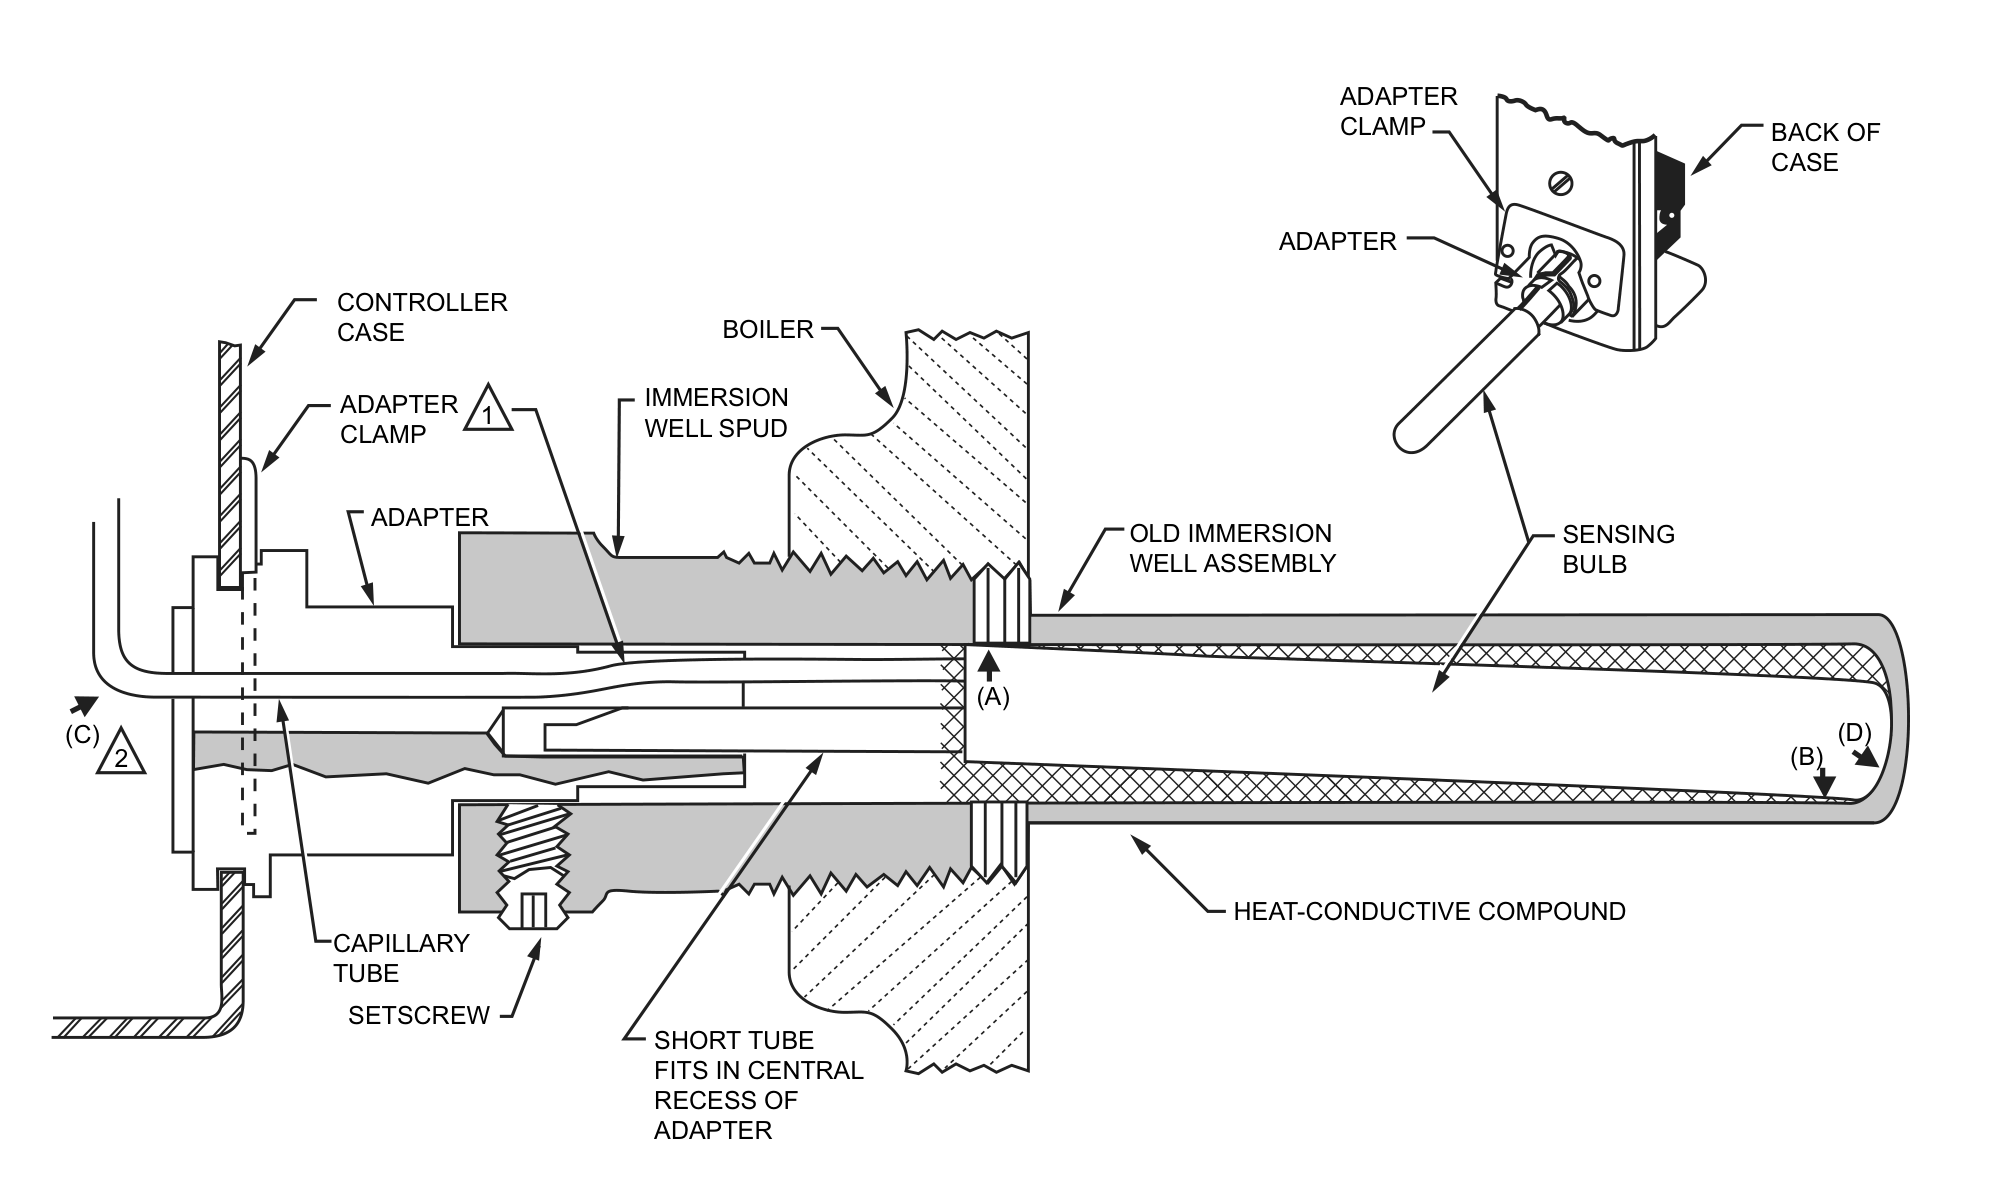
Diagram notes (text version)
- Slightly bend in tubes should hold bulb in good thermal contact with the well at two opposite points, as in (A) and (B).
- Assure that tubes fit freely in adapter so that tension of the capillary tube at point (C) holds the sensing bulb in good thermal contact with the bottom of well at point (D).
Surface mounting the L4006H
The L4006H is designed for surface mounting on piping or tank and can be mounted in any position.
When mounting the L4006H on piping, the pipe should be 1 in. (25 mm) diameter or larger for accurate temperature sensing.
- Remove any insulation from the pipe.
- Thoroughly scrape off all scale, rust or paint.
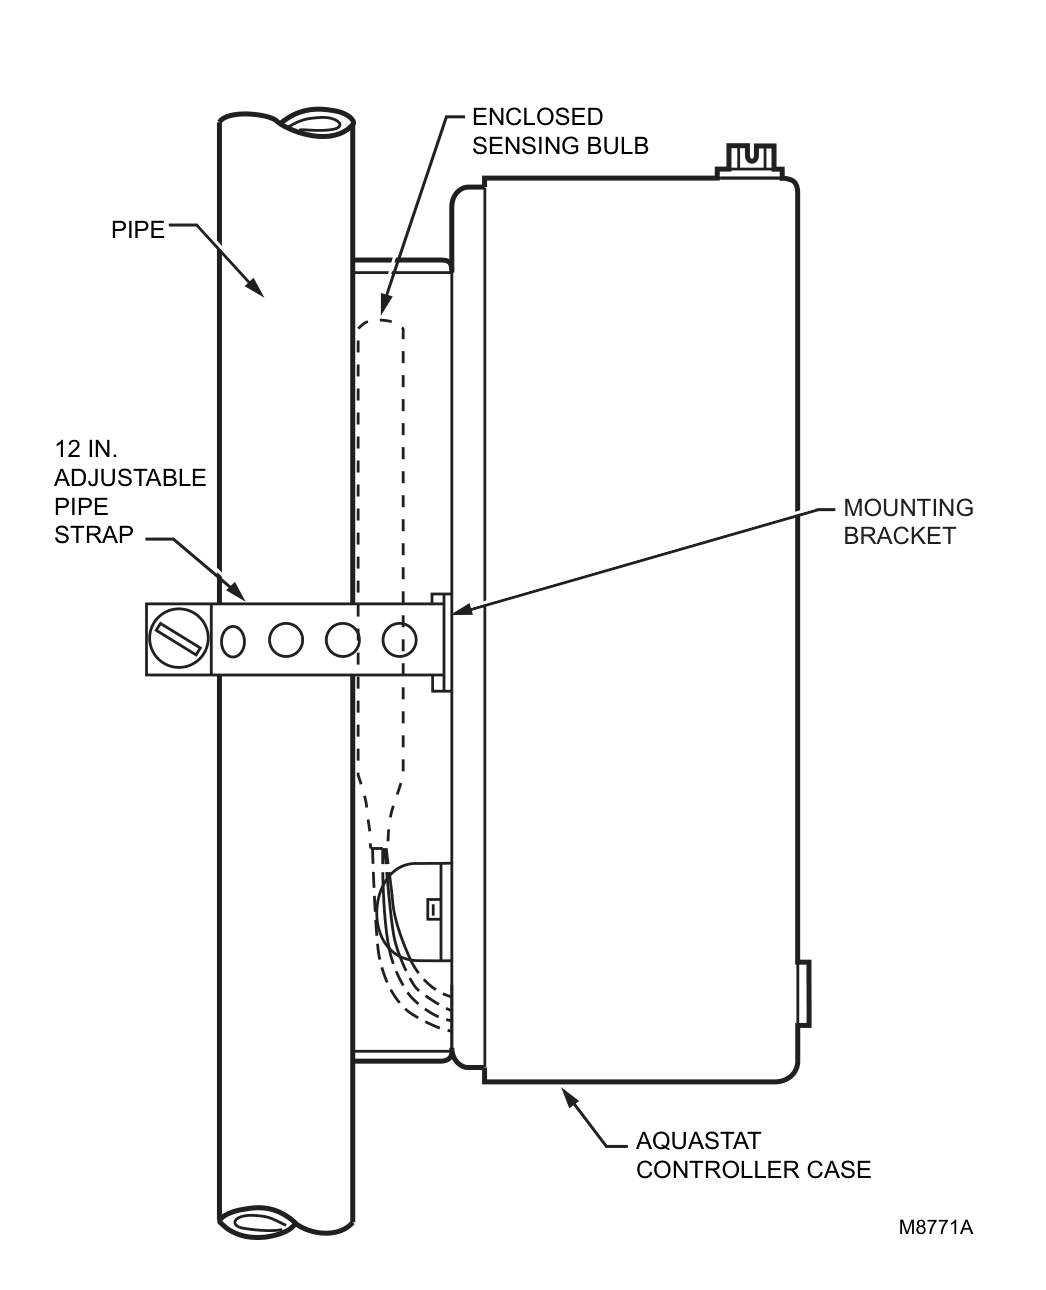
- Mount controller as shown in Fig. 3 using adjustable 12 in. (294 mm) pipe strap furnished.
When mounting the L4006H on a tank, use a pipe strap of appropriate length, approximately 6-10 ft (17.6- 29.4m) for the tank (not provided). Fit the pipe strap through the slot in the mounting bracket. See Fig. 3.
Wiring
WARNING — Electrical shock hazard. Can cause serious injury, death or equipment damage. Disconnect power supply before connecting wiring to avoid electrical shock or equipment damage.
All wiring must comply with local codes and ordinances regarding wire size, insulation, enclosure, etc. See Fig. 4 and 5 for typical diagrams of Aquastat® Controllers used in heating systems.
Use these Aquastat Controllers with copper wire only.
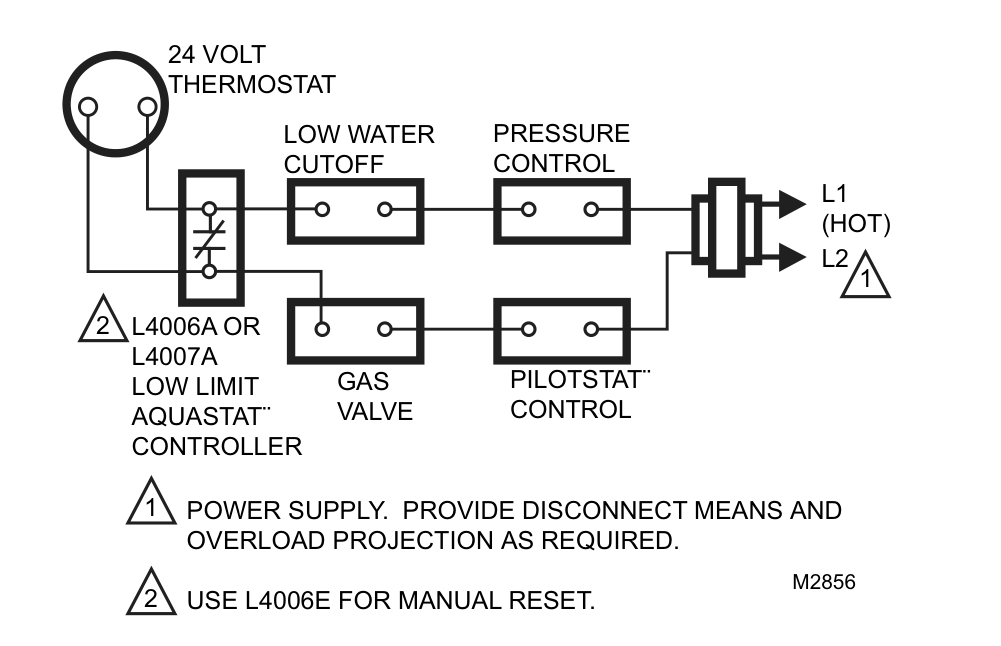
Diagram notes (text version)
- Power supply. Provide disconnect means and overload projection as required.
- Use L4006E for manual reset.
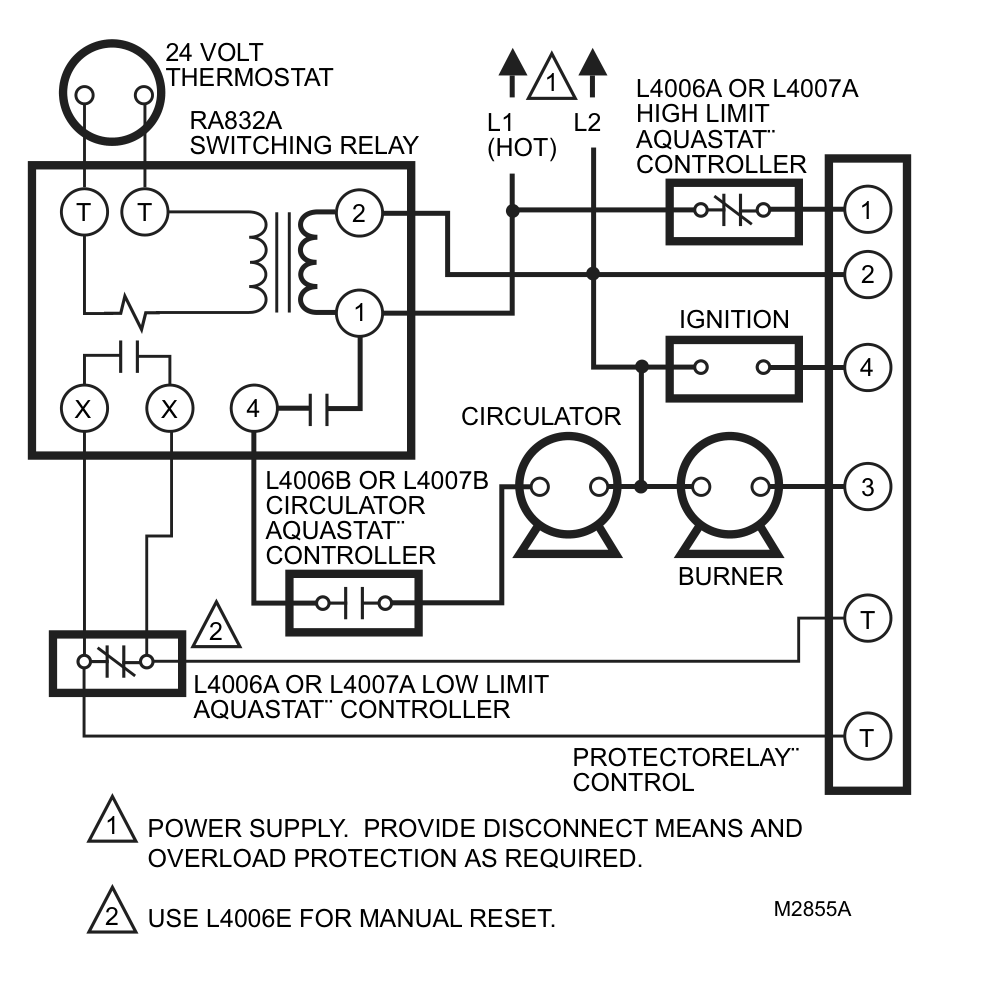
Diagram notes (text version)
- Power supply. Provide disconnect means and overload protection as required.
- Use L4006E for manual reset.
Operation
For proper selections of settings, follow boiler manufacturer recommendations:
- High limit controller: Shuts off burner when water temperature exceeds high limit setting. Burner restarts when temperature drops to high limit setting minus the temperature differential.
Note: If L4006E or H, see Manual Reset section.
- Low limit controller: Maintains minimum boiler temperature for domestic hot water. Turns boiler on at temperature setting, less differential.
- Circulator controller: Prevents circulation of water that is not hot enough. Breaks circulator circuit at temperature setting minus differential and remakes at setting.
Adjustment
Set the differential to correspond with the boiler manufacturer recommendations. To adjust models with adjustable differential, rotate the wheel on the back of the snap switch until the desired reading is aligned with the V notch in the frame. The wheel provides an adjustment from 5°F to 30°F (3°C to 17°C). Replace the cover on the Aquastat Controller.
Adjust the control point to correspond with the boiler manufacturer recommendations. To adjust, insert a screwdriver in the slotted screw type head located beneath the window in the cover. Turn the scale to the desired control point.
Manual reset
When the device includes manual reset (L4006E and H), be sure to press the red reset button on the front of the case to make sure that the controller is not locked out on safety. When checking out the system, adjust the control point low enough so the temperature of the controlled medium reaches the high limit setting, the burner shuts off, and the Aquastat Controller locks out. When the temperature of the controlled medium drops to the high limit setting minus differential, push the manual reset button and the system should be operative again. Reset control to proper high limit setting.
Checkout
Check to make certain that the Aquastat Controller has been installed and adjusted properly. Put the system into operation and observe the action of the device through several cycles to make certain that it provides proper control of the system as described in the Operations section. Further adjustments can be made to meet more exact comfort requirements.
Heat-conductive compound: material safety data sheet (DS9021)
Section 1. Product and company identification
- Product name: Heat Conductive Compound
- MSDS ID: DS9021
- Synonyms: MS1699
- Product use: Heat conductive material used to enhance contact and heat transfer in temperature sensor applications.
- Manufacturer: Resideo Technologies Inc., 1985 Douglas Drive North, Minneapolis, MN 55422.
- Date released: October 8, 1999
- Customer Response Center: 800-328-5111
- Emergency telephone information: 888-809-3787
- NFPA ratings: Health 0; Flammability 1; Reactivity 0; Personal Protection B
Section 2. Composition, information on ingredients
| Ingredient | CAS number | Percent | PEL | TVL |
|---|---|---|---|---|
| #2 Lithium Complex Grease (70%): | ||||
| Mineral Oil | 64742-65-0 | 35-50 | 5 mg/m3 | 5 mg/m3 |
| Mineral Oil | 64742-62-7 | 20-25 | 5 mg/m3 | 5 mg/m3 |
| Lithium Hydrostearate/Sebacate Complex | 68815-49-6 | 4-9 | — | — |
| Zinc Alkyldithiophosphate | 68649-42-3 | 0-2 | — | — |
| Aluminum Paste (30%): | ||||
| Aluminum, as Al | 7429-90-5 | 20-25 | 15 mg/m3 | 10 mg/m3 |
| Aliphatic Petroleum Distillates | 8052-41-3 | 10-15 | 2900 mg/m3 | 525 mg/m3 |
| Stearic Acid | 57-11-4 | 1-2 | — | — |
| Aromatic Petroleum Distillates | 64742-95-6 | 1-2 | 5 mg/m3 | 5 mg/m3 |
Additional information: Part No. 120650 (0.5 oz tube); Part No. 107408 (4 oz can); Part No. 197007 (5 gallon container). May also contain minute amounts of lithium and molybdenum lubricant compounds.
Section 3. Hazard identification
Acute health effects
- Skin: Excessive contact may cause skin irritation and dermatitis.
- Eye: Direct contact with eye will cause irritation.
- Inhalation: No adverse effects are expected.
- Ingestion: Ingestion of product may cause nausea, vomiting and diarrhea.
Chronic health effects
- Existing skin rash or dermatitis may be aggravated by repeated contact.
- OSHA hazard classifications: None.
- Carcinogenicity: Not considered to be a carcinogen by either OSHA, NTP, IARC, or ACGIH.
Section 4. First aid measures
- Eye contact: Flush eyes with water for 15 minutes. Remove any contact lenses and continue to flush. Obtain medical attention if irritation develops and persists.
- Skin contact: Remove excess with cloth or paper. Wash thoroughly with mild soap and water. Obtain medical attention if irritation develops and persists.
- Ingestion: Contact physician or local poison control center immediately.
- Inhalation: Remove patient to fresh air and obtain medical attention if symptoms develop.
Section 5. Fire fighting measures
- Material flash point: > 383°F (195°C). Will burn if exposed to flame.
- Extinguishing media: Carbon dioxide, dry chemical or foam.
- Special fire fighting procedures: None.
- Explosion hazards: None. Aluminum powder can react with water to release flammable hydrogen gas. In the form of this product, this reaction is not expected.
Section 6. Accidental release measures
Scrape up and dispose of as solid waste in accordance with state and federal regulations.
Section 7. Handling and storage
Store in dry place. Keep container closed when not in use.
Section 8. Exposure controls and personal protection
- Ventilation: No special ventilation is required when working with this product.
- Respiratory protection: None required.
- Eye protection: Not normally required. However, use chemical safety goggles or faceshield if potential for eye contact exists, especially if material is heated.
- Hand/clothing protection: Not normally required. Protective gloves and clothing are recommended, as material is difficult to remove from skin and clothing.
- Other protective equipment: None required.
Section 9. Physical and chemical properties
- Appearance/odor: Aluminum color, semi-solid material, pleasant odor.
- Solubility in water: Negligible.
- Specific gravity: 0.86.
Section 10. Stability and reactivity
- Stability: Stable.
- Reactivity: Hazardous polymerization will not occur.
- Incompatibilities: Strong oxidizing agents and halogens.
- Hazardous decomposition products: Carbon dioxide, carbon monoxide.
Section 11. Toxicology information
No data available.
Section 12. Ecological information
Chemical fate information: Hydrocarbon components will biodegrade in soil; relatively persistent in water.
Section 13. Disposal consideration
Dispose of as solid waste in accordance with local, state and federal regulations.
Section 14. Transportation information
DOT classification: Not classified as hazardous.
Section 15. Regulatory information
SARA Title III supplier notification: Include in Section 311/312 inventory reports if amounts exceed 10,000 pounds. Aluminum compounds are subject to the reporting requirements under Section 313 of Emergency Planning and Community Right-To-Know Act of 1986 (40 CFR 372). Ingredients listed in TSCA Inventory.
Section 16. Other information
This information is furnished without warranty, expressed or implied, except that is is accurate to the best of our knowledge.
Document information
Resideo Technologies, Inc., 1985 Douglas Drive North, Golden Valley, MN 55422. Customer care: 1-800-468-1502. www.resideo.com. © 2020 Resideo Technologies, Inc. All rights reserved. This product is manufactured by Resideo Technologies, Inc. and its affiliates.
60-0915—06 M.S. Rev. 05-20 | Printed in United States
Download:Honeywell L4006,7,8; L6006,7,8 AquastatÆ Controllers Manual.pdf